Birds & Bees
Season 18 Episode 1805 | 26m 46sVideo has Closed Captions
Two garden projects are on the list for this episode.
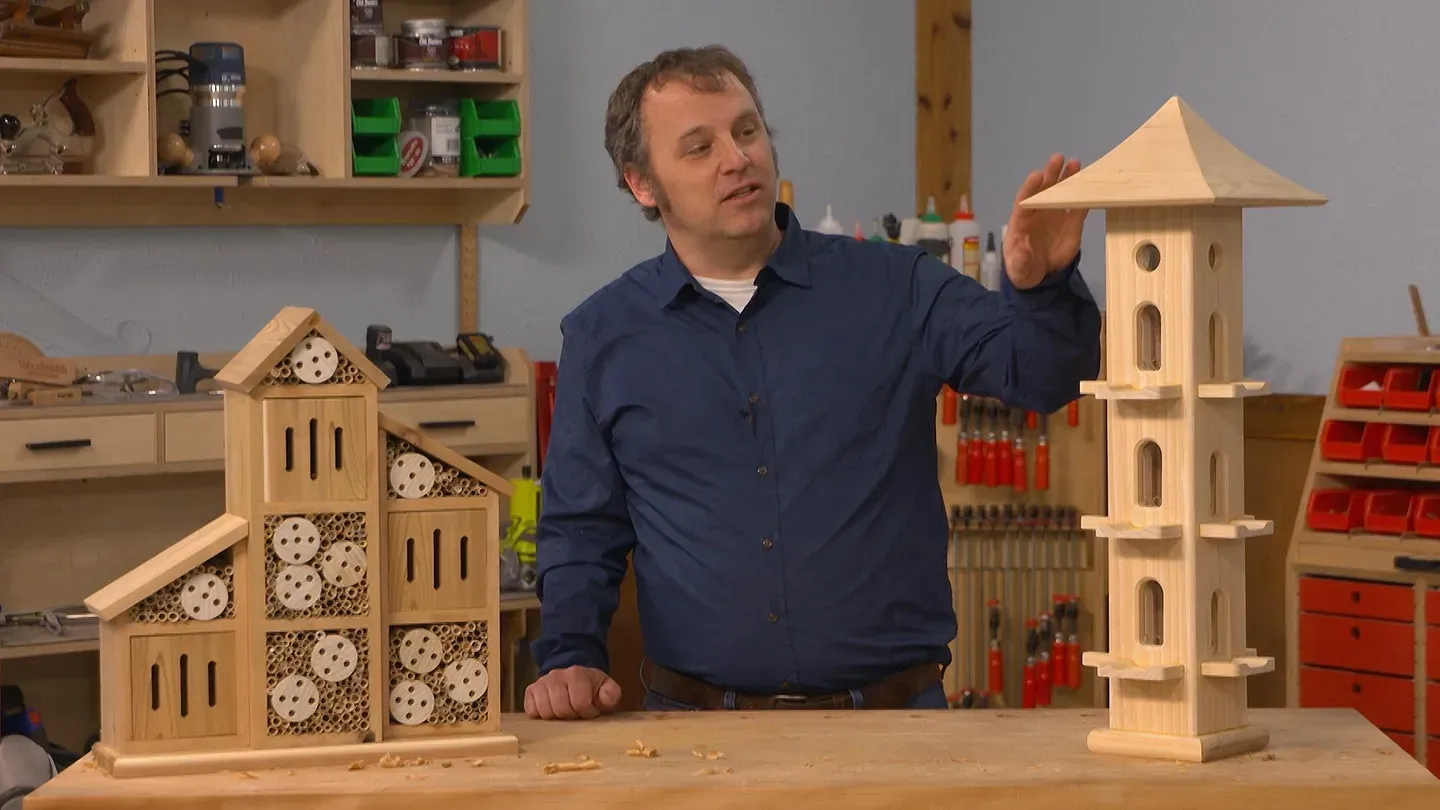
Two garden projects are on the list for this episode. Chris Fitch builds a tower bird feeder with an attractive design. Logan Wittmer constructs a home for pollinators like bees and butterflies. Along the way, discover secrets for building outdoor projects.
Problems playing video? | Closed Captioning Feedback
Problems playing video? | Closed Captioning Feedback
Woodsmith Shop is a local public television program presented by Iowa PBS
Birds & Bees
Season 18 Episode 1805 | 26m 46sVideo has Closed Captions
Two garden projects are on the list for this episode. Chris Fitch builds a tower bird feeder with an attractive design. Logan Wittmer constructs a home for pollinators like bees and butterflies. Along the way, discover secrets for building outdoor projects.
Problems playing video? | Closed Captioning Feedback
How to Watch Woodsmith Shop
Woodsmith Shop is available to stream on pbs.org and the free PBS App, available on iPhone, Apple TV, Android TV, Android smartphones, Amazon Fire TV, Amazon Fire Tablet, Roku, Samsung Smart TV, and Vizio.
Providing Support for PBS.org
Learn Moreabout PBS online sponsorship[ Power saw whirring ] Welcome back to "The Woodsmith Shop."
On today's episode, we have two fun outdoor projects.
First, Chris is going to tackle a bird feeder here, and it's a multistory tower that you can see with some really cool styling.
Best of all, the construction is pretty easy to do.
Then we're going to switch gears a little bit and Logan is going to make this pollinator house.
It's perfect for bees and butterflies, all the things that you like to see in your garden to help your plants grow, and to provide a little bit of entertainment.
The projects are both geared for the outdoors in both their materials and the adhesive and the construction styles.
If you're ready to build along with us, the plans are at our website WoodsmithShop.com Announcer: Major funding for "The Woodsmith Shop" has been provided by... Old Masters -- offering wood stains and finishes for the woodworking enthusiast and professional.
And by... Kreg -- from the first cut to the final assembly, providing woodworkers with products that help to simplify woodworking challenges.
Kreg.
Additional funding provided by... Titebond Wood Glues -- the pro's advantage.
And by...
Here at Grizzly, woodworking isn't just our business, it's our passion.
We love what we do.
Thank you for the opportunity to support "Woodsmith Shop" TV.
♪♪ ♪♪ ♪♪ ♪♪ Building the Songbird Tower is a great project.
There's just all sorts of different techniques that we're going to be using.
Now, the first place we're going to start with -- we need to make four sides for the tower itself.
I need to bevel the edges.
So let's start here at the table saw, and rip some bevels.
The sides of our bird feeder all come together in a miter.
And we're going to reinforce that miter with a spline.
So I've got this all set up right now.
I've moved my fence to the other side of the blade, and I've got my blade set to cut 1/4 inch deep groove for that spline.
So let's go ahead and take care of all eight edges now.
With the bevels all cut on the sides, it's time to do some drilling.
Now we've got a couple of things we need to accomplish here -- One is there's an inch and a quarter hole up here.
There are three windows that'll view into the seed chamber, and we have six holes that are going to be 1/4 of an inch to hold the seed trays in place.
So what I have in the drill press right now is an inch and a quarter hole to deal with our hole up here.
Use a 1 1/8 inch hole, and drill at both top and bottom of the window opening.
All right, as you can see, we've got a lot of holes drilled in these sides.
Now, what we need to do is clean up these little window openings.
And to do that, I'm going to start by using a jigsaw and cleaning out a little bit of this waste here.
Then we are going to use a template.
This was provided online by Woodsmith, and it has the opening of the window.
So I cut it out, attach it to a piece of Masonite, and then carefully cut out that opening.
And using a top-bearing clean out bed, I'll be clamping this template in place using the router to clean out a perfect opening, and we're going to make all three, four, 12 openings just right.
Well, with the round hole up top here and our windows all done, we want to dress them up a little bit.
So I've got a chamfer bit in the router.
And I'm just chamfering the edges.
Cleans it up.
Makes it look great.
All right, hey, we got our sides in pretty good shape now, but with these openings here, there's going to be a piece of plastic behind them to keep the seed in the bird feeder.
So what we need to do is to make some retaining strips that a piece of plastic will slide behind and stay in place nice and tight against the back of the side.
That's what we're up to right now.
There's going to be three steps to create these retainers.
Now I've got a piece of wood here that's 3/8 thick, and an inch and 5/8 wide, by about 19.5 long.
And I have a 5/8 dado stack set up.
So the first thing I'm going to do is mill a slot down the face of each one of these.
Then I'm going to swap out the blade to a standard rip, and I'll split that part in half.
And what we've done there is to have created a little rabbet for the plastic.
After that's done, I'll turn that blade to 45 degrees and rip a 45 degree angle on the side.
And that way when we glue them to the edge here, that 45 degree angle will line up with the bevel we already have on the side.
Everything will come together tight, in good shape, and we will have a pocket in which to put the plastic.
Our bird feeder has 12 trays, and those little trays sit under the windows and the seed spills out into them.
So it's a place for the seed to set, and they also keep the larger birds away and are a good platform for the small songbirds that we want.
So to make the trays -- two step operation.
First off, I've got a 1 inch diameter core box set up on my router table, and I'm going to begin to shape two grooves in the bottom of the stock.
And then we're going to take a flat bottom bit and shave out a little bit in between the two.
Well, it's time to start gluing some parts together.
So I've got my four sides here, and I have some Masonite splines which will fit nicely in those grooves that we cut earlier on the beveled edges.
So let's spread a little glue and get this together.
I'm clamping a miter joint.
It's always nice to put a little bit of pressure on a lot of different points, so that one point of the miter doesn't overshoot the other.
I want to keep things centered, so I'm going to end up using quite a few clamps.
And one of the fun parts of this project is dealing with the roof.
It's got angles, and angles are great, aren't they?
And we're going to scoop the roof out.
So just take a look at the end of this board here.
And you can see I've got a pencil line here and it's just an arc from one corner of the board to the other, going up to half of an inch.
And what we're going to do is we're going to use a table saw and just a standard blade, and we're going to slowly eat that material out.
It's not a very sophisticated way of dealing with it, but it's simple, it's easy, it works.
So what I'll do is begin by making a cut dead center at about 1/2 inch deep.
Then I'm going to move the fence a little bit.
drop my blade, and I'll make a cut on either side of that flipping the board, and then I'll progress along.
And it's just, uh, you know, it takes a little -- takes a little fussing, takes a few little test cuts, but simple to do.
And once we're done, I can then knock out any, uh, little bits of wood with the chisel.
Well, it's time for the fun part of this whole project.
And that is making the roof 'cause it incorporates this piece of wood that we shaped recently on the table saw.
You can see I did a little sanding work on it.
So we have this nice sweep to it.
We're going to create some triangular shapes, some bevels and we're going to make a roof.
The first thing that I need to do is to cut a 45 degree bevel on both sides of my board, and that way I can be a little more efficient with my wood usage as I cut out these triangles.
The roof panel is kind of a complicated shape.
You can see the 45 degree bevel that we applied to our piece earlier, and that's the base of our roof.
30 degree bevel.
30 degree bevel.
Weird angle, weird angle.
But it all works out.
Now I've got my blade here on the table saw, set at 30 degrees, and I have a matching -- a dueling pair of miter gauges, each set with the opposing angle.
This angle here.
Actually, it's 54.26.
I've done a sample cut, and I know that everything is good now.
So what I'm going to do to create my next part is I'll go ahead and recut this edge at 30 degree bevel.
I'm going to measure the base, switch miter saws, and cut the secondary bevel on the other side.
With a roof panels cut, it's now time to think about a little bit of joinery.
What I need to do is to cut a kerf using a table saw for a spline, and that spline is just going to help not only add a little strength, but it's going to help register things together as we glue them up, 'cause this is probably going to be a little bit of a slippery mess without any registration.
So what I'm doing is I'm just going to run these, uh, individual parts.
I'm going to use my fence and the two points as the registration and cut that groove.
Time to assemble the roof.
And you can see I've got it dry fitted here.
So let's go and take it apart.
And you can see here are the splines which will help register and hold things together.
So first thing, plenty of glue.
All right, now the question is, how do we clamp this thing?
There are a couple approaches you could use.
One is you could put some pieces of wood to sort of bind the base and then simply apply weight to the top, which will force everything together.
But I've got something a little more fun.
These are, uh, spring clamps, and they have a wide variety of uses.
They have pointed ends on them.
You open them up with this tool, and you can apply them across a joint, and they bite into the woods just a little bit.
Now it does leave a small mark in the woods, so it's not for every project.
But I'll tell you what, for a lot of things, these things are just a lifesaver because you can see how quickly they are to apply and they will pull together odd-shaped parts, such as the project we have here -- where pretty much no other clamp will work.
So this is definitely one of those secret weapon tools you're not going to use often.
For the right project, they are a lifesaver.
And so there we go.
I'll let that dry.
I'll pull up my clamps off, get everything sanded up, and we'll be ready to move on with the next part of the project.
Well, I got lots of parts here, and it's time to put our bird feeder together and get it done.
First thing we're going to do, we have our body for the bird feeder.
And this is a block which is going to fit in the end of it.
And this hole right here -- that's for the pole that the bird feeder sets on.
So since we last did a few things at the router table, you can see we did that bullnose block, I've added these two plugs to it, drilled a hole.
With the bottom block here, it's important, and we want to be generous with the glue and make sure we get a really good seal.
So with that done, let's tap it in place.
There we go.
Okay.
Next step -- we have all these little seed trays.
If you remember, we put a lot of holes in our sides and we created our tray on the router table.
So I've got some small dowels that I've placed in the holes here that I've drilled, which match the holes in our sides.
Now, when I apply the glue, I'm making sure to apply glue to this whole back rear edge of each tray.
That's ingrained, and I want to make sure that that's well sealed as well as adhering the tray to the side.
All right.
There we go -- 12 seed trays in place.
Now what?
Remember, we cut those retaining strips, and we have these big openings here.
So we need some plastic behind there to keep the seed in place.
Now I used some 1 1/8 inch plastic I got at a home center, and cut the dimensions and then drilled holes for the seed to come out.
Now you are going to have to experiment a little bit with what kind of seed you use and what's the right size of hole.
I chose a hole that's about 3/8 of an inch for fine millet.
If you're using a coarser seed, you may want to go a little larger.
The bit that I used was a brad point because it's got the spurs out the side, and that makes for a nice, clean cut.
And unlike a regular twist bed, it's not going to lift the plastic up into the drill bit, so it's a little bit safer and a little easier.
So these just slide into the retainer.
And you can see the hole is over the tray.
Next up -- remember that roof we had glued together.
Well I took all my clamps off and I sanded all of my joints, got things nice and smooth.
To keep the roof in place, we have two parts that you'll need to make.
As you can see, there's a block in here and this block has a 45 degree angle, cut on all four sides so it fits snugly against each roof section.
And that's glued in place.
And that combined with this block which fits in our tube here, makes for a very solid assembly.
It has a lot of weight.
The wind's not going to blow it off in a storm.
So let's see how it fits.
And there we go.
Take it off as you need to fill the feeder.
Our plastics in place.
All that we need to do now is apply a finish if we choose, get a pull, get some birdseed, sit back and enjoy the birds.
You know, projects like birdhouses or bird feeders like Chris just built are really that stereotypical project.
But those aren't the only outdoor projects that we can build for critters in our garden.
What I'm going to build right now is going to be a bee house.
I'm not talking a beehive like you'd have for honeybees, I'm talking about house to house mason bees.
So I've already pre-cut a few of my parts.
Let's go over to the table saw where I cut some joinery, and get this project started.
Now this bee house consists of basically three sets of cubbies -- we have left, right, and center.
We'll work on the center set of cubbies first.
What that consists of is a pair of sides with a back.
Now the sides are going to capture these dividers that are going to be spaced out throughout it.
So here we're going to go ahead and cut the joinery for those.
Now as you can see I've already installed a dado blade.
And I've set this dado blade up to match the width of my parts.
That way when I make a dado, part's going to fit nice and snug with just enough room for glue.
And I've also attached a sacrificial fence to the rip fence.
What I'm gonna do is I'm going to slide this up right until it is kissing the blade.
And if it rubs a little bit, that'll be okay.
I'm going to create a rabbet on the bottom edge of each side and along the back edge.
The back edge rabbet is going to be for the back, a little bit later.
After I have those two rabbets cut on each side, I'm going to go ahead and use the rip fence to position my other dados.
And once those are all cut, we'll swap this out for a crosscut blade and miter the tops.
All right, so now that I have all the dados cut and the rabbets, we can go ahead and trim these parts to the final length.
Now obviously, that lower rabbet tells us what's the bottom.
But on the top, we need to cut an angle to match the angle of the roof that we're going to add in a little bit.
And to do that, I've installed a crosscut blade and I've tilted it at 45 degrees.
I'm going to trim these parts to length using the miter gauge with a stop on it.
That's going to make sure that the two sides match perfectly.
Now that we have all the joinery cut, we can go and get the center section glued up.
What I'm going to do is start with some waterproof glue.
We want to make sure we're using an outdoor glue, so it's waterproof.
And we're going to put glue in each of those dados, as well as this bottom rabbet.
Now I'm going to stay away from the back rabbet for right now because once I get this all glued together, I'm going to put the back in place, and I'm going to mark where those 45s meet the back, so I know where to cut that peak on here.
And now we'll go ahead and start putting these dividers in there.
Just slip them into place.
There we go.
So now I'm going to go ahead and let this dry.
Once it's dry, I'll go ahead and stick the back in there, mark where those 45s meet.
But while this glue is curing, let's go ahead and head over to the drill press and we're going to start making some bee tunnels.
Now, those cubbies that we created for the bee house aren't really great bee habitat, so what we're going to do is we're going to stuff those cubbies with these guys.
And these are just natural reeds that have been hollowed out.
And you can buy these from a lot of suppliers as bee habitat.
And while this would work well, just to stuff the entire thing, we're going to mix it up a little bit.
We're going to mix it up by including some of these large dowels.
We're going to drill holes in these -- five holes in particular -- just to kind of mix it up and give the bees a couple of options.
So here at the drill press, I've went ahead and clamped this dowel into a wooden hand screw.
Now, the wood enhancer does have a notch in the end.
And that's important -- that's going to keep this dowel from twisting as we're drilling it.
So I'm going to go and position the drill bit.
And then I'm going to make a smooth pass all the way through until we pop out the other side.
I'm going to do that for all five of these holes.
I'm going to make several of these, that way when we go ahead and start stuffing the bee box, we can go ahead and include these where we want them.
Alright, now, after leaving the glue to cure for a couple hours, that's what we're left with with the center tower.
Now, looking at the other ones, we have that left side, and then we have the right side.
So you can kind of see how this entire bee house gets built.
Now, the remainder of the parts are pretty basic.
First, we have a base.
Now, this is just a piece that's cut to length and width.
And I routed a chamfer around the edges just to soften the appearance.
It's completely aesthetic.
You could leave it perfectly square if you wanted.
So then these guys are going to plop right on there.
Just like so.
And then they'll get attached with screws from the bottom.
Now, after these cases dried, I did go ahead and cut the backs, as well.
All I did there was take the stock, lay it in place, and then I marked these angles.
Then I cut those with the band saw and sanded them flush.
It's a pretty straightforward process.
I'll set those sides apart for now.
And then the final piece to create the structure of this is going to be the roof.
The center one is simply two pieces that I rabbeted together, and that will get attached to the top with glue and probably a couple of pin nails once everything's glued up.
The two side ones will simply be cut at a matching angle and applied to the top here.
But now we have a little bit more habitat to make.
We've already done these bee tubes, but we want to get the bees some friends.
So we're going to create these guys.
These are little butterfly doors.
That's going to allow butterflies to get inside and create cocoons.
And these will be pivoting from the top so you can get in there and clean them out after the season.
Now, creating these is pretty simple.
I did this at the router table.
I started with my blanks cut to size, and I set up a couple of stop blocks, and then with a straight bit, I went ahead and plunged the workpiece over the running bit and routed from right to left, then flipped the workpiece over and completed the slot.
Then flipping it side for side, I created both of those and re-set up the router table to create the center bit.
So that creates these slots.
I think it looks really nice.
Now, in the plans, it has us attaching these with dowels before we glue these up.
But because I wanted to keep working, I went and glued these up in the first place.
So now what I'm going to do is I'm actually going to attach these with nails.
So I'm just going to use one nail through the top on each side.
That's going to allow this to pivot.
I do just want to leave a little bit of space on the top side, though, so those corners will clear it and you can access it.
There we go.
So now at the end of the season, we can get in there, clean out anything that's left after the butterflies leave.
Now all we have to do is start assembling this.
♪♪ ♪♪ ♪♪ ♪♪ ♪♪ ♪♪ ♪♪ ♪♪ ♪♪ ♪♪ There we go.
So now all that's left to do is add a finish and then go ahead and stuff up these boxes with whatever habitat we want.
It's going to be probably a mixture of these dowels that we made and these reeds.
Now, there's a couple things I really like about outdoor projects like this.
First, it brings some entertainment to our outside garden.
Another thing I like is, because it's an outside project, it doesn't really have to be a polished furniture piece, and, in fact, something like a birdhouse or a bird feeder or a bee house actually benefits from a little bit gappy joinery.
That airflow really helps the insects or the birds thrive in that environment.
It's a great little project.
I think it's gonna look great in the garden.
♪♪ The two projects featured in today's episode of "The Woodsmith Shop," the pollinator house and the bird feeder, have a lot going for them.
They don't require a lot of materials, so they're easy on the budget.
They're also great projects to introduce people to woodworking, and you'll find that there's a lot of skills that you can learn and pick up that you can apply to a lot of other projects.
If you're ready to get started building your own, the plans are at our website, WoodsmithShop.com.
While you're there, you can check out all the other great woodworking information to help you become a better woodworker.
There's project ideas, more videos, and tips that you can apply to your next project.
And then we'll gather right back here for another great project in the Woodsmith Shop.
♪♪ ♪♪ ♪♪ If you'd like to get more video tips and techniques, sign up for the free weekly Woodsmith eTip.
Every week, you'll receive an e-mail with a video tip to get more out of your table saw, router table, and more.
Sign up at WoodsmithShop.com.
Everything in today's show comes from the newly expanded Woodsmith Guild Edition with shop projects, plans, tips, and techniques.
To get a free preview issue of the Woodsmith Guild Edition and a free Woodsmith book, go to WoodsmithShop.com.
In addition, past seasons of "The Woodsmith Shop" are available on DVD, or you can watch them online from your computer, tablet, or mobile device.
For more information, go to WoodsmithShop.com.
Announcer: Major funding for "The Woodsmith Shop" has been provided by... Old Masters -- offering wood stains and finishes for the woodworking enthusiast and professional.
And by... Kreg -- from the first cut to the final assembly, providing woodworkers with products that help to simplify woodworking challenges.
Kreg.
Additional funding provided by... ...Titebond Wood Glues -- the pro's advantage.
And by...
Here at Grizzly, woodworking isn't just our business, it's our passion.
We love what we do.
Thank you for the opportunity to support "Woodsmith Shop" TV.


Support for PBS provided by:
Woodsmith Shop is a local public television program presented by Iowa PBS