E4 | Rusty Bulkhead, Granite Stairs | Ask This Old House
Season 23 Episode 4 | 23m 42sVideo has Closed Captions
Mauro restores a bulkhead; Tom talks combination squares; Mark repairs granite stairs.
Mauro Henrique transforms a rusty bulkhead to look new with some paint and sanding; Tom Silva explains what combination squares are, their uses, and how to buy a quality one; Mark McCullough helps a homeowner repair his crumbling mortar on his brick front stairs by fixing the position of his granite treads.
Problems playing video? | Closed Captioning Feedback
Problems playing video? | Closed Captioning Feedback
Funding for THIS OLD HOUSE is provided by The Home Depot.
Support provided by:

E4 | Rusty Bulkhead, Granite Stairs | Ask This Old House
Season 23 Episode 4 | 23m 42sVideo has Closed Captions
Mauro Henrique transforms a rusty bulkhead to look new with some paint and sanding; Tom Silva explains what combination squares are, their uses, and how to buy a quality one; Mark McCullough helps a homeowner repair his crumbling mortar on his brick front stairs by fixing the position of his granite treads.
Problems playing video? | Closed Captioning Feedback
How to Watch Ask This Old House
Ask This Old House is available to stream on pbs.org and the free PBS App, available on iPhone, Apple TV, Android TV, Android smartphones, Amazon Fire TV, Amazon Fire Tablet, Roku, Samsung Smart TV, and Vizio.
Keep Exploring


This Old House Insider Newsletter
Get This Old House exclusive stories, tips, and behind-the-scenes information delivered right to your inbox every month.Providing Support for PBS.org
Learn Moreabout PBS online sponsorship♪♪ Kevin: On "Ask This Old House," our experts travel across the country to answer questions about your house.
♪♪ Brooke: This is our bulkhead.
As you can see, it's pretty faded and a little unsightly.
Kevin: Today, Mauro gives a bulkhead a facelift with a fresh coat of paint.
Brooke: I love it.
Kevin: Then, Tom shows some of his favorite combination square hacks.
And Mark helps a homeowner straighten out his slanting steps.
All that on "Ask This Old House."
♪♪ Mauro: Hi, Brooke.
Brooke: Hi, Mauro.
Nice to meet you.
Mauro: Nice to meet you.
You wrote in for some help with exterior paint?
Brooke: Yeah, I have a project.
It's right around the side of the house.
Should we go take a look?
Mauro: Let's take a look.
Brooke: All right.
So, this is our bulkhead.
As you can see, it's pretty faded and a little unsightly.
And we spend a lot of time in the yard.
Mauro: Yeah.
Brooke: So I was hoping to spruce it up a little bit.
Hopefully it doesn't need to be replaced, but what do you think?
Mauro: Well, I don't think you need to replace this door.
I think we can make this look really good.
But I can see some rust spot here, some here, a large one here and there, and a little bit here.
But, in general, it looks pretty solid.
Brooke: Okay.
Mauro: All right?
But we've got to do some prep work here, taking care of this rusted spot.
And we'll be ready to prep and paint.
Brooke: Okay.
Sounds good.
Mauro: But I'm also curious to see how the inside looks like on those doors.
Well, look at this.
This is in much better shape than the outside.
And you still can see the original color brown, but it needs to be cleaned up.
Brooke: Okay.
That's good to know.
Question for you.
What color do you have in mind for this bulkhead door?
Brooke: So I was thinking black because our house is black and white.
But what do you recommend?
Mauro: Because we have different shades of green in this backyard here, it's beautiful.
Brooke: Yeah.
Mauro: And I would not go black because you have enough black already around the house.
I would go on a darker color, with very much undertones of green.
Brooke: Okay.
Mauro: Okay?
If you look from a distance out there, it's going to look -- you're going to read as a black, but when you get closer, you'll see the undertone of green, which will fit pretty good with what you have back here.
Brooke: Yeah, I love that idea.
Mauro: All right.
So we're gonna get some stuff, you and I... Brooke: Okay.
Mauro: ...and we go to work.
Brooke: All right, let's do it.
♪♪ Mauro: First step, what we're gonna do with this orange tape here, we're going to be working on this surface.
So I don't want to put any paint onto the vinyl.
I got this.
I'm gonna measure it right here.
Brooke: All right.
How's that look?
Mauro: That looks pretty sharp.
Just press the tape.
Just run your finger like this.
Brooke: Okay.
Mauro: Now what you're gonna do is you're gonna fold that back to the front.
Just like that.
Now I'm going to do this side, and I want you to do it the same way as you did here... Brooke: Okay.
Mauro: ...on the side there.
Press it down.
Make sure that paint won't leak underneath the tape.
All right.
Now here's what we're going to do.
You got this tape, and we got the plastic right here, right on top of the orange tape.
Yeah.
So, this is a good way to protect.
Now you want to fold it back down.
Keep opening it up.
Good.
Now, carefully, you're gonna go like this.
Brooke: Okay.
Mauro: Okay.
Tap it down.
All right.
Let's do the same thing on that side.
Brooke: Okay.
Mauro: Go all the way down.
Brooke: Okay.
Mauro: Press the tape against the orange tape.
All right?
Brooke: Okay.
Mauro: Keep going.
Mm-hmm.
All right.
I'm gonna take care on this side over here.
Brooke: Okay.
Mauro: This all makes part of the preparation.
We cover the siding because you're not painting the siding.
The ground should be protected, too.
Brooke: Okay.
Mauro: All right?
Try to get right under the tape.
Yep.
Right there.
Okay.
Let's gear up, and we're gonna start to sand it.
Brooke: Okay.
Sounds good.
Mauro: All right.
This is called a sanding block.
Just choose any grit.
So that's how I go -- all the way down.
You don't have to sand down to bare metal, just enough to remove any peeling paint or rust.
If you didn't do this, any loose paint will eventually flake off, taking the new paint with it.
Brooke: So should I do a little bit more on spots like this?
Mauro: Yes.
You see, like, a little rough spot?
We need to smooth that out.
Just press it down a little bit and make sure that's nice and smooth.
You can feel it.
All right?
Brooke: Okay.
Yep.
♪♪ Mauro: It is important to clean the dust from sanding before we paint, or the paint won't adhere properly.
♪♪ There we go.
Nice, nice, nice.
This is a metal primer.
Brooke: Okay.
So are we just spraying the rust spots?
Mauro: Correct.
And that will also help to prolong the life of this paint job.
Brooke: Okay.
Sounds good.
Mauro: Great.
That looks good.
Well, what do you think so far, Brooke?
Brooke: It's looking better.
Mauro: Well, you did a great job with the primer.
It's dry and lightly sanded.
Now it's time for paint.
The color we are using here is called black forest green.
Brooke: So, is this a special type of paint?
Mauro: Yes.
This is what we call DTM, which stands for "direct to metal."
Brooke: Okay.
Mauro: DTM paint will hold up well in the elements.
It will protect against rust and corrosion better than regular paint.
That looks very good.
Nice and even.
Beautiful.
♪♪ Now, our first coat is dry.
It's time to apply the final and second coat.
♪♪ Here we go.
Brooke, what do you think?
Brooke: I think it looks so much better.
Mauro: Looks better.
What about the color?
Brooke: I love it.
I think it blends in really well.
Mauro: Oh, it came out really nice.
So most important thing, keep this door as clean as possible.
Brooke: Okay.
Mauro: And then, if you see any spots that you need to take care of, just lightly sand, touch up with the paint, and it should be good to go.
Brooke: All right.
Sounds easy enough.
Mauro: I love this color.
I love the door.
I love the way it turned out.
So now we got a brand-new door.
Brooke: Thank you so much for your help.
I really appreciate it.
Mauro: Thank you.
Thanks for having me here.
♪♪ ♪♪ Kevin: Hey, Tommy.
Tom: Hey, Kevin.
How are you?
Kevin: All right.
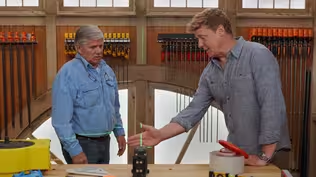
Look at your collection of combination squares here.
Tom: Combination squares.
Great little tool.
I used to use it a lot more than I use it today, but I still use it in the shop a lot.
Kevin: Okay.
So, walk me through the parts and pieces here.
Tom: Well, combination square comes in different sizes -- 6s, 12s, 18, and 24.
It has a steel ruler, obviously different size.
The ruler and the slide handle right here is 90 degrees and 45 degrees.
Kevin: And that slides back and forth, and you can lock it into place with a little thumbscrew right there.
And some of them even come with a little bubble for level.
Tom: Yep.
And for small things.
Kevin: Yeah.
Tom: It also has a scribe in it, right there, which is a real sharp point.
Kevin: And you can mark with that instead of a pencil.
Tom: Can use it to scribe it on a piece of metal, because a lot of metalworkers use these, also, but it's a fine line that you can follow.
Kevin: So, how were you using it, generally, or were using it back when that was in your pouch every day?
Tom: Well, I was using it for framing, squaring lumber and 45 degrees.
But the problem with it was, framing is, that the metal ruler would bend because it would be in my belt or something, and you're climbing in and out of rafters and stuff like that, so you bend them.
So the long ones were no good for me.
But I would use them for mitering and offsetting, also.
So let's say I'm doing a casing, a window casing, something like that.
Kevin: This is the jamb.
Tom: Yeah, that would be the jamb.
I would set my depth that I'd want the offset for the casing to be to the jamb, and let's say 3/8 of an inch.
So I'd set my ruler on 3/8 of an inch, and I'd lock it in.
Now that's not going to move.
I would take a square, and on this one, it has a little groove right there the pencil will ride in, but it basically holds the pencil in it.
So now when I pull the square, it pulls the pencil along with it.
Kevin: Mm.
Tom: So now I have the distance that I want there.
Same thing -- put the pencil in the groove... Kevin: Right.
So you mark the jamb here.
Tom: Yeah.
And then you just take your casing... Kevin: Yeah.
Tom: ...put it on the jamb, put it on the line, and your distance is parallel with the edge.
Perfectly all around the door or the window, whatever the offset I want it to be.
Kevin: And it's going to be the same not just on this jamb but on every jamb, because you've got this locked in... Tom: Right.
Kevin: ...and you just move from door, door, door, window, window, window.
Tom: Yeah.
So if I was doing a room with three windows and a door, I would set that and then go in and do all my offsets first and then cut all my trim.
Kevin: I have seen, at least in the shop, I have seen them used as depth guides.
Tom: Oh, yeah, they're fantastic for depth guides.
So, let's say I want to do a cabinet joint, and it's a dado and a rabbet together.
Kevin: Okay.
Tom: All right.
And I want to check the depth of that.
You can just basically take the square, loosen the nut, make sure it's sitting flat on the wood, push it down, hold it down, lock it.
Now that's the depth of my dado.
And I know that my rabbet needs to match that.
So I cut a rabbet and check the size of that to see if it works.
Put it together.
I get a perfect rabbeted dado cut that matches perfectly.
Kevin: Very clever.
Okay.
So, which one of these is not like the other?
Thumb screw on every one of them we've looked at so far.
No thumbscrew on this.
Tom: Yeah.
Kevin: And yet look at that.
So it stays rigid enough that you can use it, but it easily adjusts.
And that's because of the magnets.
Tom: And saved a little time.
Saves the turning of that nut, and it added up over time during the day.
I kind of like that.
I've never seen one like that before.
Kevin: Really?
You like it, and you've never seen it, which means this is the last time I'm gonna see it.
Tom: You might have a point there.
Kevin: That's gonna walk off.
Tom: Yeah.
Kevin: If I drop mine, is it toast, or can I adjust it, or...?
Tom: This is where paying the right price in the beginning can save you money in the long run, because it will stay truer.
So, take this one right here.
Pick that up.
Kevin: Okay.
Tom: Now take this one and hold that one.
Kevin: Oh, yeah.
This feels like twice as heavy.
Tom: Yeah.
Night and day.
Kevin: Higher quality here.
Yeah.
Tom: Big difference.
So quality -- you'll get your money back when you buy quality.
So let's take a regular piece of wood, and we'll check the square to see if it's out of square.
Kevin: Okay.
Tom: All right.
So, all you do is, like, any square, you would take it and put it on the wood, and you'd hold it firm, draw a line, flip the square over... Kevin: Mm-hmm.
Tom: I got to line this end up right there with the line.
Run my line.
All right.
Now you see that?
So that tells me that this square is off just a little bit.
Kevin: Right.
So this one's got to either be adjusted or go away.
Tom: Right.
Kevin: Perfect.
All right.
Well, good information, Tommy.
Appreciate it.
Tom: My pleasure.
Kevin: Here you go.
[ Both laugh ] ♪♪ Tom: You must be Mark.
Mark: Yes.
Tom: Hi.
I'm Tom.
Mark: Hey, Tom.
How you doing?
Tom: Well, I'm doing all right, but I'm feeling better now that you're here.
Mark: All right.
Well, great.
Tom: Can I tell you a little bit about these steps?
Mark: Sure.
Tom: So, you know, first off, we've got this great home, great neighborhood.
Mark: Looks nice.
Tom: And I actually really love these stairs.
I think I've been here now 12 years.
Mark: Okay.
Tom: I do my best to take care of them, did a little repointing.
Learned a little bit here and there.
But something's happening on this tread.
That's when I thought, "Ah, I'm over my skis.
I need a little bit more help."
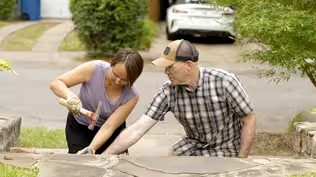
Mark: All right.
Well, first of all, I think you did a great job keeping these steps intact.
And what we want to do is figure out why we do have the problem.
So the first thing I looked at is, you can see these treads.
You can see the face of these treads, how they have debris and dirt on them.
Tom: Yeah.
Mark: Okay.
That's actually a good sign because that means the treads are tipped properly and the water is running down the steps.
When we get to the problem tread, you can see... Tom: It's nice and clean right here on the face.
Mark: So that means water is not running off.
Tom: Going the wrong way.
Mark: And, also, I know we had rain a couple days ago.
I can still see remnants of a puddle right there.
Indicates to me that everything is being pitched back.
One of the problems is that you'll develop a crack in the back.
Once you get water behind that crack, in certain type of weather, like winter, we experience the freeze-thaw situation, and that's what's pulling this tread towards the walkway.
And if you step over here, Tom, you can actually see the pitch of the stone going backwards.
And if you follow this, you can see the damage created by the water.
When the ice gets behind it, it pushes it out.
It takes the brick with it.
What we're gonna have to do is remove that tread and really find out what's going on.
Tom: Can I ask you one more thing?
Mark: Sure.
Tom: Something else that's kind of been worrying me is these railings.
Are we in trouble here with these railings and the stairs, or is that going to be okay?
Mark: So, great question.
If you look at this railing...
Okay.
That's really stuck into the ground.
It's really stuck into the granite up there, as well, so that's a plus.
If it ain't broke, don't fix it.
Tom: Nice.
Mark: All right?
Tom: Well, how do we get started?
Mark: So, why don't you jump over there.
Tom: All right.
Mark: I'll jump over here.
And we're just going to try to tip it forward.
Okay.
Now bring it to me.
Okay.
Just as I suspected.
Some of these brick want to come with us, but that's fine.
So now just twist out and pull back.
Keep going.
All right.
We ended up taking some brick with us.
Tom: That's all right.
Mark: Bend your knees.
And then just flip it up.
All right.
Hey, Tom, look at this.
Tom: Wow.
Mark: So, this is all water damage.
Mortar is supposed to get very hard as it sets up, but when you have moisture damage like we have here, this is what happens.
First off, we want to get all this loose material out.
Tom: Okay.
Mark: So, usually, these mortar beds should come out in pieces.
Tom: You mean it's not supposed to be like play sand?
Mark: Yeah.
We're taking it out as dust.
Yep.
Just go right back to the bucket with it.
Tom: Got it.
Mark: So, I'm getting down to some solid stuff.
But look at this, Tom.
I found a broken brick.
Tom: Oh, it just crumbled.
Wow.
Mark: So just crumbling.
And, again, this is more classic masonry water damage.
This is what happens to bricks.
You can see remnants of the joint up here.
We're going to have to take that stuff out.
Sometimes I like to use the back of my brick hammer as a chisel.
Look at all this extra stuff I just pulled.
Tom: Yeah.
Wow.
So you just keep going until it won't come anymore?
Mark: Until we get solid, solid, solid.
Another thing we want to make sure we do is test all these brick, just a pull test, and make sure they're solid.
Tom: Yep.
You feel really good.
Mark: All right.
Now that we have the tread out and we have it basically cleaned up, I'm looking at this joint.
You can see it's no good.
Right?
Tom: Yep.
Mark: And it goes all the way to here, and then it gets good.
So, if you want to take this chisel and start hitting down on it, you'll see that it comes out pretty easily.
There you go.
And don't forget we have to go at least 3/4 of an inch deep.
Okay, this happens sometimes.
The joint has switched on us.
This is a lot harder on this end, so I think we're going to switch to a HEPA vac and a grinder.
So, now we're ready for repointing.
You have to get the mortar all the way back to make contact with the existing mortar.
So don't be afraid to push it in as hard as you can.
Tom: Now, how do I know if I'm all the way back?
Mark: Because it starts to pooge out just the way it is.
Tom: And I think this is probably a good time to do this.
It's okay if I make a mess down here.
Mark: That's right.
We're gonna clean up.
All right, Tom, I'm gonna show you a little trick.
Tom: All right.
Mark: Sometimes when you get to these corners, the mortar wants to fall out.
That trowel up there against that, you have something to go to now.
All right, so, Tom, I like to wait until I can see my fingerprint on that mortar.
That means it's good to go.
But right now, we're going to put what we call a concave bevel joint.
And you can see that this joint now matches all the other joints.
We want to make sure we ride the heel and just feel it out, but we want to make sure it stays even.
So you don't want to go too deep, but you don't want to be too shallow.
Excellent, excellent.
Okay, I think we're ready to brush the front.
Tom: Kind of knock down the high stuff here?
Mark: Just knock down the high stuff.
Some of that stuff we call snots.
That's great.
You can see that we had a little overrun on the mortar.
The only way that's going to go away is if we sponge it.
Now, one thing I want you to notice is I'm not hitting the masonry joint itself.
So all we want to make sure we do is stay on the edge of the brick.
We're gonna take this joiner and we're going to do what we call a slick.
See that slick right there?
When we do that slick it actually waterproofs that mortar joint.
♪♪ Because this mortar is old, we're gonna want to wet it down.
That way, it won't suck the water out of the mortar that we put the tread on.
Now we're ready to lay some brick.
Level.
And now joints are perfect.
And, again, I'm gonna -- I'm gonna joint... now... because it's gonna be easier for me.
Tom: So, can I work towards you while you work towards me?
Mark: You can.
Tom: All right.
Mark: So, now it's time for the tread, but before that, we got to put a mortar bed down.
And don't forget, our original problem was pitch.
Give you a little toss right there.
Time for the tread.
Granite doesn't bond that well to other masonry products, so what a lot of masons do is they'll use what we call a glue.
It's Portland cement and water.
All it needs to be is just a coating.
And again, I want to make sure I get all the nooks and crannies.
Tom: Little more?
Mark: I'll take a dab.
Yep.
Right where I wanted it.
Tom: Okay.
Mark: I'm gonna hit this blob.
Go right down.
Great.
Just help me wiggle it a little, Tom.
Tom: Are you pushing down as you wiggle or just wiggle?
Mark: I'm pushing down as I wiggle.
And I'm pushing down on the front side.
Okay.
There's my quarter bubble.
Make sure you have the same.
Tom: I have a quarter bubble.
Mark: Yeah, great.
Okay.
Couple things we have to check is the overhangs.
This is a 2-inch.
2's gotta go that way to you.
See what you have.
Just match it to the step above it.
Tom: I've got like 2 1/4.
I have -- yeah, 2 and -- Just about 2 3/8 there.
Mark: Okay, great.
We left this joint open on purpose, but we want to close it in.
So what we're going to do is take those flat joiners.
And we're really, really gonna pack this entire joint.
Tom: All right.
Mark: All right, Tom, what do you think?
Tom: Oh, I love it.
It's -- It looks great, and it feels good to know that it's a step again and it's pitched the right way, and it's gonna shed the water.
Mark: Great.
Well, I'm gonna leave you with a little bit of homework.
Wait 28 days for this to cure.
After that, get a power washer out here.
Clean up some of this green mossy stuff, a little bit of that rust.
You'll be good to go.
Tom: Well, thank you very much.
Mark: All right.
Tom: Yeah.
Mark: So, if you have questions, we'd love to hear from you, so keep them coming.
Until next time, I'm Mark McCullough for "Ask This Old House."
♪♪ ♪♪ Kevin: Next time on "Ask This Old House"... Nathan helps a homeowner install a recessed bathroom cabinet.
Then, Mark replaces a homeowner's chimney crown.
Man: That looks beautiful.
Kevin: And Mark also shares a few treasures he's found over the years.
Oh, there's a note inside.
Mark: There is, yes.
Kevin: Did you read it?
Mark: I had to.
I couldn't resist.
Kevin: All that on "Ask This Old House."


Support for PBS provided by:
Funding for THIS OLD HOUSE is provided by The Home Depot.