Just Right Workbench
Season 18 Episode 1801 | 26m 45sVideo has Closed Captions
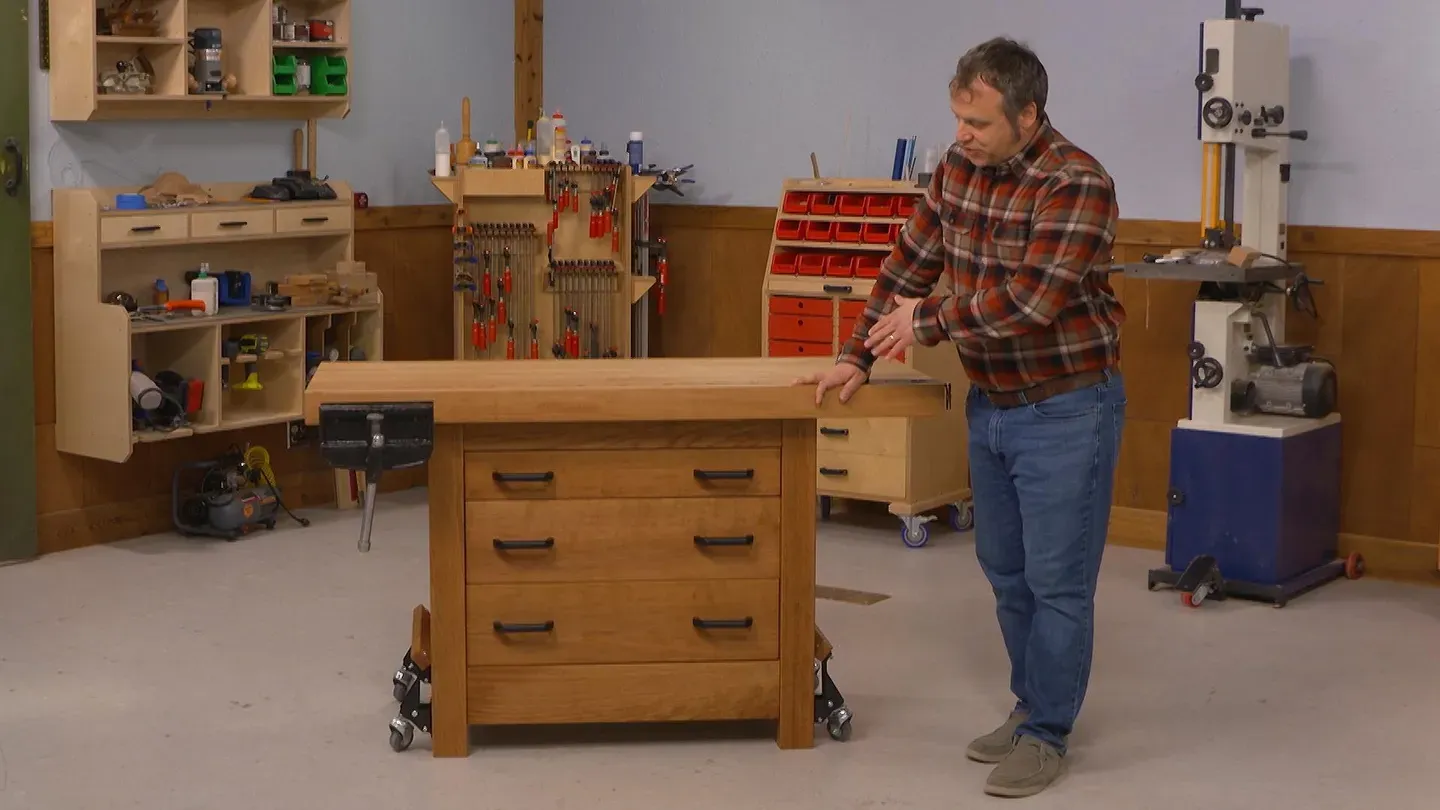
Join Phil, Logan, and Chris as they build a new workbench for the Woodsmith Shop.
Join Phil, Logan, and Chris as they build a new workbench for the Woodsmith Shop. This one is sized for smaller shops but still has big-time features. It also looks good too. Learn smart techniques for sturdy joinery and flattening benchtops.
Problems playing video? | Closed Captioning Feedback
Problems playing video? | Closed Captioning Feedback
Woodsmith Shop is a local public television program presented by Iowa PBS
Just Right Workbench
Season 18 Episode 1801 | 26m 45sVideo has Closed Captions
Join Phil, Logan, and Chris as they build a new workbench for the Woodsmith Shop. This one is sized for smaller shops but still has big-time features. It also looks good too. Learn smart techniques for sturdy joinery and flattening benchtops.
Problems playing video? | Closed Captioning Feedback
How to Watch Woodsmith Shop
Woodsmith Shop is available to stream on pbs.org and the free PBS App, available on iPhone, Apple TV, Android TV, Android smartphones, Amazon Fire TV, Amazon Fire Tablet, Roku, Samsung Smart TV, and Vizio.
Providing Support for PBS.org
Learn Moreabout PBS online sponsorship[ Saw whirring ] ♪♪ For the last 17 seasons on "The Woodsmith Shop," we've used the same workbench.
It's a great big maple top that's served us really well, but we wanted to try a different kind of bench for this season.
So what we're building is something that we're calling the Just Right Workbench.
It's not too long, but it's built solid and sturdy for years of use.
We have a solid wood beech top, and then the base is made from cherry and cherry plywood.
And one big addition are the three drawers that you see down in front here, providing some much-needed storage.
We have some pretty cool vises that we're gonna add to the bench as well -- an inset vise on one end and we're going to refurbish a vintage vise for the face vise on the other side.
If you're ready to build along with us, the plans for the Just Right Workbench are at our website, WoodsmithShop.com.
But I think right now, it's time to build.
Announcer: Major funding for "The Woodsmith Shop" has been provided by... Old Masters -- offering wood stains and finishes for the woodworking enthusiast and professional.
And by... Kreg -- from the first cut to the final assembly, providing woodworkers with products that help to simplify woodworking challenges.
Kreg.
Additional funding provided by... ♪♪ Titebond wood glues -- the pro's advantage.
♪♪ And by...
Here at Grizzly, woodworking isn't just our business, it's our passion.
We love what we do.
Thank you for the opportunity to support "Woodsmith Shop" TV.
♪♪ ♪♪ ♪♪ The base of our workbench consists of four really stout legs, joined with rails and aprons to create a framework.
Inside that we're going to put a box with drawers.
I'm getting started here with the legs.
We're gluing up two thick pieces of cherry in order to make each leg.
Squared them up, cut them all to the same length.
The focus now is on the joinery, and that's what I want to talk about here.
At the front of the workbench, we need to create a nice opening for the drawers.
On the sides and on the back, we're going to have the rails and aprons like I talked about, but then also some plywood panels that will enclose that space.
For mortises this large, I'm going to use a Forstner bit here in the drill press.
And the process that I'm going to use is to kind of drill not quite overlapping holes here all the way down, and then there's going to be some ridges of waste in between those.
I'll come back, plunge down and remove a lot of that waste, and then probably make a third pass just to clean up the mortise as much as I can.
Here's what you're looking for after you're done at the drill press.
The walls of the mortise should be pretty smooth.
You might see just a little bit of some nibs there, or lines from where the drill press went down into the mortise, but we're going to leave that alone.
What we want to do now is to square up the ends of it, to receive the tenons that we'll make on the rails and the stretchers.
To do that, I'm going to line up a chisel that matches the width of the mortise, in this case 3/4 of an inch, right on that layout line and hold it vertical.
Then I'm going to hit it with a mallet a few times, and then I'll lever the chisel forward to pop out the waste, and then continue on in that fashion, working my way down to the bottom.
The mortises are only one part of the joinery that you'll need to take care of on the legs.
The other part is connecting some of those mortises with a long groove for the plywood panels we talked about earlier, I'm doing that here at the router table.
Have a straight bit set up, and with the fence set to its proper location, it's kind of programmed in and then I can just bring each leg in and rout it.
Now, it's a stopped groove running from mortise to mortise.
That makes it much easier to rout, because I can lower the workpiece at the mortise over the bit.
Then I'll just rout until I hear the bit stop cutting when it reaches the other mortise, then I can lift it off and move on to the next piece.
Just make sure that you're routing based on your layout lines, so that you're routing the groove in the correct pieces.
We'll leave aside the legs for a little bit and focus on the next stage of the joinery, and that's to take care of the grooves that are in the rails on the side assemblies of our workbench, as well as the two stretchers that will make up the back assembly.
Now something to note about these is that these grooves aren't centered.
They're offset to one side.
So I have a data blade set up here in the table saw, with that offset measurement being that distance between the blade and the rip fence.
So you want to make sure that you keep the inside face of all of your parts up against the rip fence as you make these cuts.
Now we're ready to cut the tenons on the ends of the rails and the stretchers.
For that, I'm going to set up here at the bandsaw with one of my favorite tenon making techniques.
What I'm going to do is set up the rip fence to cut both sides of the tenon without having to move it.
I also have a stop block here that's going to set the length of my tenon.
The key to getting the tenon properly sized is the spacer block that you see right here.
Now the spacer matches the thickness of the mortise.
In this case it's three quarter of an inch.
So I have a piece of three quarter of an inch MDF here.
I also need to account for the thickness of the bandsaw blade and that little kerf that it cuts.
So I glued on some cardboard that's pretty close to the same size.
And then I use double sided tape to hold it in place on the rip fence.
And there I have it, the exact size of spacer that I need.
What I'm going to do is I'll turn on the bandsaw, make one cut with the workpiece riding against the spacer.
Then I can pull the spacer block away, and then that shifts the workpiece over to cut the opposite side of the tenon.
I'll do that on both ends of all of my parts.
I find it just as easy to cut the shoulders on the tenons here at the bench with a handsaw than any other way.
What I've done is I've drawn in the line first with a pencil, making sure that it was right on.
Then I can go over it with a knife to create just a little bit of a line for the teeth on the saw blade to catch.
Then, with my backsaw using my thumb as a guide, I can get it started right on that knife line.
Make a couple of real short quick strokes and then lengthen them out, getting the saw blade to lay down right onto that knife line, and then cutting flat down into the rest of the tenon.
Completing the work on the tenons involves cutting the upper and lower shoulders, which might sound like a lot of sawing by hand, but there's a way to simplify that process.
I start by just making a cross cut straight down at the shoulder line, then to avoid sawing the long grain here, what I do is take a chisel and a mallet, then just a couple of firm blows, you can remove big chunks of waste pretty quickly.
A couple of paring cuts at the end, and you have a great looking shoulder there.
And you don't have to really worry about it being a tight fit.
You can have a little bit of play there, and that's going to help get the parts aligned later on.
Then what we can do is size the panels that fit in our assemblies here.
I'm starting with the two side assemblies and then at the table saw with the dado blade, cut a rabbit on the inside face and you want the remaining tongue to fit in that groove that we routed a little earlier.
Last thing that I did to wrap things up here was to use a block plane and plane a chamfer on the exposed edges of my rails and the long stretchers.
So that's where we are here, ready to start assembly.
What I'm going to do is apply glue to the faces of the tenons, and then run a bead of glue into all the grooves, and then insert the panels so that it'll fit in place.
Add the other leg on top of it.
Lay it all down on the clamps and snug everything up.
You might need to add a second pair of clamps across the top, just to balance that clamping pressure, and make sure you get your joints to close up tightly.
Finishing up the assembly on the base portion here just involves bringing in the long pieces.
First, what you want to do is run a bead of glue along the top stretcher, and then start buttering up your tenons and inserting them into the mortises.
Don't forget to add the back panel, too, and fit that into the grooves.
To add the other side, I put some glue on the exposed upright tenons and then lifted the opposite side, set it in place just to get the joinery started.
Then I can flip it back upright and get out the long clamps and pull everything together.
We'll just double check to make sure everything's square here, and then let it set aside until the glue dries.
One last thing, don't forget to chamfer the bottom ends of the legs too.
I'm just going to make a... few passes on each of the edges.
And then what you're doing is you're going both across and down so that you avoid chipping out the bottom corner or the far corner.
When you're building a workbench, adding even more reinforcement is always a good idea.
On this bench, there are four corner brackets that connect the stretchers and the rails, and kind of cross brace this whole assembly on the bottom side.
All right, moving on from the corner braces, what we also need to do is add some thick spacers here.
Because when we fill this inside with drawers we want to place to be able to mount the full extension drawer slides on.
So I cut some pieces that fit in between the legs and they'll get screwed to the plywood panel here.
The key thing now is spacing them accurately and consistently.
So I have a piece of plywood that I cut down to the right size to match the spacing.
Set the filler strips in place and then drive the screws.
You can do that on both sides, then move the spacer up to the next one to install the other set.
It's a quick and easy process.
An open base on a workbench is an invitation for clutter and dust and chips to collect.
So on this workbench, the inside is filled with three drawers.
We have two larger drawers and one narrower drawer that provide a lot of storage space for tools and supplies, and keep them relatively dust free.
Now the drawers boxes are built with plywood and have a tongue and dado joint on them.
The sides have a dado cut over at the table saw, and then there's a matching tongue cut on the front, again using a dado blade at the table saw.
Then the boxes can be assembled.
We attached them with full extension slides.
So you see that we can get to the full contents of the drawer and see everything really easily.
To dress things up, the drawers have false fronts in cherry to match the base frame that we've made, and a pair of large handles make opening the drawers really easy.
They're screwed in from the front and have these decorative caps just to clean things up.
If you're ready to get started on a bench of your own, the plans are at our website woodsmithshop.com.
♪♪ Most important part of a workbench -- It's the top.
Not just any top, a top that's true at level, that's heavy, that absorbs blows, easy to work on.
And you know what?
It's not that hard to do.
But we have to have a strategy.
We need to break it down.
When we make a large top like this, we of course start by ripping a lot of lumber.
For this top, we've chosen beech.
Now you can make a top out of about anything.
But I like beech and I like maple.
The beech has a nice warm color to it.
It's not too dark.
Dark tops are hard to work off of.
It's stable and it's a pretty good price right now.
So we've got all these parts ripped and we've made sure that they're about the right width.
So our total top is 25.5in.
Now if it's a little less or a little more that's okay.
We've broken the glue-ups down to three pieces.
You can see these two are already done.
The reason for doing that is because, hey, this is heavy, it's a little easier to handle, and my planer is only so wide.
So we're going to glue these sections up.
With these three pieces, we'll send them all through the planer, we can come back to the bench and glue up our total top.
♪♪ ♪♪ Well, here are the three sections for our workbench top.
Each of them has been playing to a thickness of three inches, and I jointed both faces to make sure I can find a good edge to match up and glue.
So time to glue.
Just like before, really want to make sure that I use a good fresh glue that's going to hold well and use plenty of it.
Make sure it's evenly spread.
The glue that I'm using for this project is just standard woodworkers PVA glue, and that's going to give us a good bond.
If you wanted to use epoxy, you probably could.
But I really just enjoyed the easy cleanup and all the workability I get using regular woodworkers PVA.
So next up we need to flatten the top.
Now we could of course use a belt sander or something like that, but my preference to use a hand plane, and the blade I have in here is special.
This is a serrated or toothed blade, and what I love about a toothed blade is it doesn't tear out like a conventional iron, and it does leave a nice texture to the wood, too.
Now, as I work my way down through flattening this bench, I'm going to need to check it periodically with a straight edge and make sure that I'm flat this way.
And I'm also going to need to make sure that I'm flat along the length, and I also need to check and make sure that I don't have any twist to the bench.
So a lot of things to keep track of, but you do a little bit, you check things, and before long you got it done.
There is a strategy to how to do this.
Now the first series of planing strokes, we're all on a 45-degree angle and second and back and forth.
Then I went all the way across.
I even did a few lengthwise strokes with the hand plane.
The more directions you go into, the easier it is to flatten.
The final texture that you see here was done by going back over to 45-degree angle, with the blade set very light, and the reason I wanted to do that was I really like this nice tooth to the surface.
If you want a slick workbench where your workpieces go flying off onto the floor, that's up to you.
Here at Woodsmith, we really like to have that slightly rough texture, and it's super easy to resurface your bench anytime you want to with that toothed blade.
To trim the ends of the workbench, I'm going to use a track saw.
You know, you can't do better than these things to give a smooth cut, no chips, and it's easy to set up.
If you don't have one, no big deal.
Just make sure you clamp a nice clean piece of wood with some sort of a straight edge.
Make sure it's square and you'll be just fine.
Now, because our bench is three inches thick, I'll be cutting from both sides of the bench.
To attach the workbench top to the base, I'm going to use these lag screws.
They're tough, they're long, and they're about 3/8 of an inch diameter.
The holes we have here in our cleats are a half inch.
So they're oversized.
And that's going to give things a chance to move with the changes of humidity.
So what's left with our workbench top?
Well, it needs dog holes, it needs a vise, it needs a tail vise, it needs to be chamfered on the edges.
And Logan's going to take care of all those details for us.
♪♪ So now that the construction is done on this workbench, we have to decide what type of work holding we want on it.
And for this bench, we've decided on two different types.
We're going to do a face vise in a little bit, but right now we're going to concentrate on this guy.
This is a tail vise.
This is a commercially available one that gets recessed down into the bench.
So we have to do is we have to create two different depth recesses.
One will be for this narrower, deeper part, and then there will be a wider, shallower one for this flange.
So the first thing I'm going to do is position this kind of where I want it.
Keeping in mind that in conjunction with this tail vise we need a row of dog holes.
So I'm going to set it close enough to the edge that we're going to miss the workbench structure underneath the top.
Okay, now I'm going to also make sure that this end is aligned with the end of the workbench.
We don't want it overhanging at all.
And now we're going to create that recess with a bearing guided pattern bit.
That bearing is going to ride along these pieces of plywood that we're going to attach down snug up against that vise, and to hold them down instead of screwing into the benchtop, which we could do and that would work well, we can also use double-sided tape.
Just make sure that that's pressed nice and firmly up against the end without scooching that vice, and then we'll press it down.
Okay, there we are.
Now, that is the perfect shape for that deep recess.
So we're going to go and route that in multiple passes, and then we'll see how it sits.
♪♪ So now that I'm down to final depth for the deepest part, we can check that fit.
That feels pretty good.
So now what we need to do is we need to create that shallower, wider recess for this flange.
And then I'm going to do exactly the same thing, just setting the depth on the bit so it makes a very shallow pass.
So after we have the tail vise installed, our next step here is going to be to drill a series of matching dog holes.
Those are going to be in line with the center of that tail vise.
And that's going to be for brass bench dogs that's going to allow us to pinch the workpiece between the tail vise and that bench dog.
Now to drill these, I'm going to use this drilling guide.
What this drilling guide does is it holds the drill perfectly plumb, so those holes are going to be plumb.
And there's a chuck on it that's going to accept a bit, and I'm using a three quarter inch spade bit here.
And on the other end is driven by a drill.
And I'm using a quarter drill just for a little bit of extra power, because I do have a bunch of holes to drill.
And I've already laid out all of these lines, and I'm using a fence on this drill guide to keep the position from the front edge of the bench the same.
Okay, there we go.
So I went ahead and chamfered these holes.
And that just avoids any chip out as you're raising and lowering those dogs.
And you can see that those brass dogs fit really nicely in the holes.
So the vice we decided on for the front vise is going to be this one, this is a vintage-style vise.
Now you can pick up vintage devices used, but they might be a little bit more expensive than you expected, but they are made really well.
Now the problem is when you pick them up, a lot of the times they'll be a little rusty and grimy and this one was as well.
So I went ahead and cleaned it up and restored it so it looks good for this batch.
So let me walk you through what I did.
So first thing I did was strip it all down and break it apart into as many parts as I could.
The parts that we were going to paint, I hit with a wire brush and a degreaser.
And a wire brush and a drill really takes all that grime and rust off.
Then I hit it with a couple coats of primer and finally the top coat.
That top coat is still a little soft.
It's going to take a couple of weeks to really harden up, but then it should be really tough and ready for years of use.
For the steel parts, the stuff that was round, like the handle, I was able to chuck in the lathe.
Then I use the wire brush and sandpaper to really polish those up.
Now there's still some dings in there, but that's just a character from it's past life.
With this style of face vise, it can be mounted in two different ways.
The first is with this front jaw, proud of the front of the workbench.
That means you just put this guy underneath the workbench top and attach it with some lag screws, and that will work really well.
But we found that we really like having this front, this back jaw flush with the front of the bench.
So what I've done is I've already routed in a recess.
And I did that the same way that we did the tail vise.
I held this up there and I used some plywood just as fences.
And then I ran it out with a router, so this rear jaw is going to sit flush with the bench.
Now this vise is really heavy.
It's cast iron.
And that's one of the things I like about it.
But I'm not going to hold it up underneath the bench to install it.
So what I'm going to do is I'm going to set this off to the side, flip the top over, and then we'll install it from the top side.
There we go.
Now, I think you'll agree that that vintage vice looks great on this bench.
Now, the only thing left to do is attach the top.
But I'm going to wait until the finish is applied, and then this bench is ready to be put to work.
♪♪ You know, probably my favorite feature on this workbench are the drawers underneath.
I like having a lot of my most-used tools close at hand, and I don't want to have the underside of the bench get all cluttered up with dust and chips, and the drawers there provide the great solution for that.
Now, another thing that we've added to all of our benches and a lot of the shop fixtures are sets of casters, so that we can easily raise up the bench and then move it around wherever we need to.
To wrap things up here, I've applied a coat of oil to the cherry base just to bring out those deep red tones that we really like, and I did the same thing on the top, but here that's just to keep glue and finishes from sticking to the benchtop.
Now this is a great bench for any size workshop, and particularly if you have a smaller shop.
We're calling this the "Just Right Workbench."
If you're ready to build your own, the plans are at our website WoodsmithShop.com.
That's also the place where you'll find more free project plans, great ideas for your shop, and the tips and skills you need to become a better woodworker.
And then we'll gather right back here to build another great project in the Wood Smith shop.
♪♪ ♪♪ ♪♪ ♪♪ If you'd like to get more video tips and techniques, sign up for the free weekly Woodsmith eTip.
Every week you'll receive an email with a video tip to get more out of your table saw, router table, and more.
Sign up at WoodsmithShop.com.
Everything in today's show comes from the newly expanded Woodsmith Guild Edition with shop projects, plans, tips and techniques.
To get a free preview issue of the Woodsmith Guild Edition and a free Woodsmith book, go to WoodsmithShop.com.
In addition, past seasons of the "Woodsmith Shop" are available on DVD, or you can watch them online from your computer, tablet, or mobile device.
For more information, go to WoodsmithShop.com.
Announcer: Major funding for the "Woodsmith Shop" has been provided by... Old Masters -- offering wood stains and finishes for the woodworking enthusiast and professional.
And by... Kreg -- from the first cut to the final assembly, providing woodworkers with products that help to simplify woodworking challenges.
Kreg.
Additional funding provided by... ♪♪ Titebond wood glues -- the pro's advantage.
♪♪ And by...
Here at Grizzly, woodworking isn't just our business, it's our passion.
We love what we do.
Thank you for the opportunity to support "Woodsmith Shop" TV.


Support for PBS provided by:
Woodsmith Shop is a local public television program presented by Iowa PBS