Limbert-Style Bookcase
Season 18 Episode 1807 | 26m 46sVideo has Closed Captions
Here’s a bookcase project that provides storage with style.
Here’s a bookcase project that provides storage with style. Filled with Arts & Crafts details, this solid wood bookcase is made from locally sourced oak and features a glass-paned door. Best of all, it small enough to fit anywhere.
Problems playing video? | Closed Captioning Feedback
Problems playing video? | Closed Captioning Feedback
Woodsmith Shop is a local public television program presented by Iowa PBS
Limbert-Style Bookcase
Season 18 Episode 1807 | 26m 46sVideo has Closed Captions
Here’s a bookcase project that provides storage with style. Filled with Arts & Crafts details, this solid wood bookcase is made from locally sourced oak and features a glass-paned door. Best of all, it small enough to fit anywhere.
Problems playing video? | Closed Captioning Feedback
How to Watch Woodsmith Shop
Woodsmith Shop is available to stream on pbs.org and the free PBS App, available on iPhone, Apple TV, Android TV, Android smartphones, Amazon Fire TV, Amazon Fire Tablet, Roku, Samsung Smart TV, and Vizio.
Providing Support for PBS.org
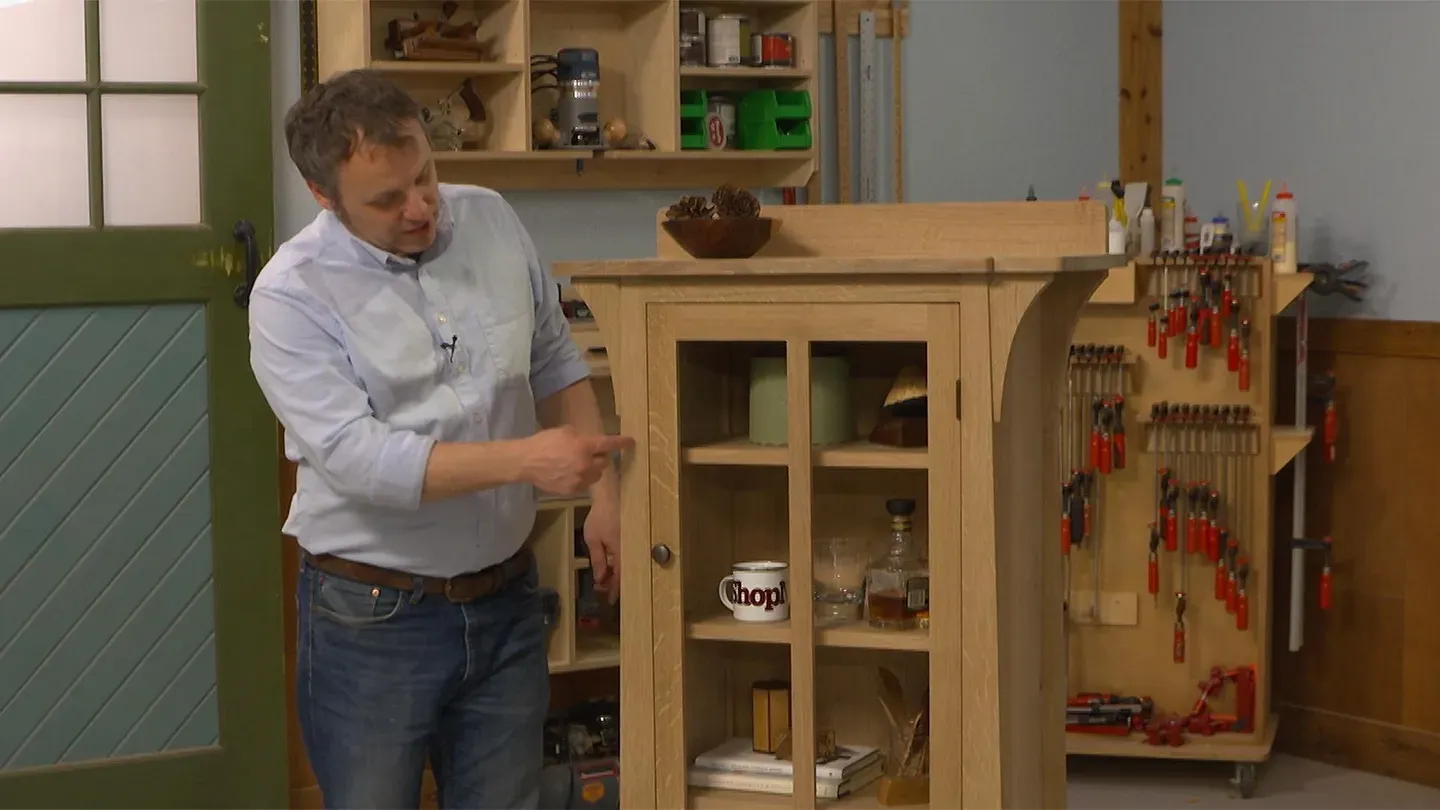
Learn Moreabout PBS online sponsorship[ Power saw whirring ] [ Mid-tempo music plays ] Welcome back to "The Woodsmith Shop."
The project on today's episode is this Arts and Crafts style bookcase.
It's patterned after an original designed by Charles Lindbergh.
Now he called it his number 357 bookcase.
However, we found that this style of project can work great as more than just a bookcase.
You could use it as a display cabinet or a China cabinet, even a pantry in a small kitchen or an apartment.
Now, arts and crafts furniture can tend to feel hulking and boxy, but as you can see on this one, it has gracefully tapered legs, curving corbels, and some curved details that you'll find scattered here and there.
There's also a glass pane door to be able to see what's going on inside of it.
For this project, we're starting at the very beginning.
It's a very good place to start.
Logan's going to begin with rough-sawn boards that he milled himself and then bring them down into our final workpieces.
I'm going to build the case, and then Chris is going to make the door.
If you're ready to build along with us, the plans are at our website.
WoodSmithShop.com.
It's time to build.
Announcer: Major funding for "The Woodsmith shop" has been provided by... Old Masters -- offering wood stains and finishes for the woodworking enthusiast and professional.
And by... Kreg -- From the first cut to the final assembly, providing woodworkers with products that help to simplify woodworking challenges.
Kreg.
Additional funding provided by... ...Titebond Wood Glues -- the pro's advantage.
And by...
Here at Grizzly Woodworking isn't just our business, it's our passion.
We love what we do.
Thank you for the opportunity to support Woodsmith Shop TV.
♪♪ ♪♪ ♪♪ ♪♪ So the start of any project really comes down to picking out what material you're going to use.
This Limbert style bookcase is no different.
Now the Limbert style generally be using a course on white oak, and one of the things that I really enjoy is using local woods.
I mean, I have a sawmill, so a lot of times I'm harvesting and using local trees.
Take this piece for example.
This is a white oak.
It's a burr oak and it's an interesting wood.
We get a lot of it growing here in Iowa.
And it's a true white oak, but it's kind of a savanna type oak.
It limbs fairly low, so a lot of times you'll have a lot of knots to deal with.
Uh, and it can like to twist.
This piece is fairly twisted.
But this is the perfect thing to use to break down into some of these smaller parts that we're going to use on this bookcase.
So the first thing I like to do when I'm working with a rough cut, air-dried slab like this is take a look at the landscape and kind of see what the grain looks like.
Now, I picked out this slab because it does have some really nice flecking throughout it.
Those medullary rays are coming through really prominently.
And I was originally going to try to get the legs out of this because it is a thicker piece of wood, and we could get the leg stock out of this thicker material, but with these knots that are kind of popping up and the cracks, I think we're going to audible.
We're going to glue up the legs instead.
But I can still use some of this really nice figure for some of the more prominent parts on this bookcase, like the top, uh, maybe the upper and lower rail.
And I have some other really nicely figured stuff that we'll use for the door also, because that's front and center.
So when I'm working with a rough-cut slab like this, I like to first look at the grain, like I said, and then I like to start laying out parts.
Kind of identified the areas that have really nice figure.
Now this has some water spots on it from being in the kiln, but I know that the top for this is about 30in long.
But I know that this end, because it's the chainsaw cut end that's going to be probably about 2 inches of waste.
So I'll mark that.
And that's just going to be a discard.
So I'll start with measurements there.
And as I said that tops about 30in long.
Usually I'll give myself a couple of extra inches.
So we'll mark that here.
And I'm using chalk just because it marks really nicely on this rough surface.
I can see it and it cleans off extremely easily But I'll mark this as the top.
Now we have this crack right here where the heart of the tree is.
And I'm not terribly concerned about that, because the top is only about 14.5in wide, and this piece of wood is thick enough that I can cut this single piece out and resaw it and get two 3/4 inch pieces out of it to form the entire top.
So, now I'm going to work down the slab, laying out pieces that I know we can get out of this, and then I'll grab a saw and we'll start breaking it down.
Okay, now I've laid out most of the parts that I want to get out of this.
We have the top.
We have the rails, upper and lower rails.
I have a couple of spots for corbels because those aren't very big, and we can kind of cut around some of these smaller knots.
But what I'm going to do first is I'm going to basically cut this in half.
I'm going to make this cut here to free up the top, the rails, and this section of corbels.
Okay, now breaking it down, a slab like this is done pretty easily at the band saw.
There's a couple of keys, though.
First is you want a fairly wide blade.
We're basically making straight cuts here.
So, the wider the blade, the better.
This one's a 3/4 inch, two TPI, three TPI blade.
And that's going to cut really nicely.
The other thing we need to keep an eye on is our outfeed.
And what I mean by that is, as I'm cutting the slab, as I'm getting towards the end of the cut, there's gonna be a lot of weight hanging off the back side of the saw.
You can set up outfeed rollers.
That will work really well.
But what I've found I like to do is about halfway through the cut, I'll actually stop, let the saw keep running, but I'll walk around the back side of the saw, and then I'll finish the cut by pulling the slab through.
That means once the cut's finished, the back end of the slab is supported by the band saw, and then I can get them down before shutting off the saw.
So, now we have to get these flat and usable.
So, the first thing we're going to do is I'm going to make a pass with the workpiece flat on the jointer.
And this is to create a flat face on it.
I'll make a couple passes until I can see all that rough-sawn material's removed and I got a good, clean face.
And then I'll actually stand up and square up and straighten one edge using the fence on this jointer.
Alright, so, now I've transformed this machine over to planer mode.
And what this is going to do is going to bring our parts down to thickness.
Now I did resaw some of them to get two parts out of one thick board, and others, I just decided to remove some of that waste because I find it's much faster to do it at the band saw than it is here at the planer.
So, now what I'm going to do is I'm going to start bringing all the parts down to the correct thickness.
Now, there's a variety of sizes.
So I'm going to plane all of the parts that are say 1 inch at once, so they're a consistent thickness, and then I'll go to the next size down.
Once I have everything sized, I'll go ahead and glue up a few of the panels, like the top and the sides that need to be a little bit wider.
And then I'll hand this off to Phil to start building.
Logan's work to this point has been taking large pieces of wood and breaking them down into smaller pieces of wood, and making them relatively flat and smooth.
My job now is to reverse the process.
We're going to take those smaller pieces of wood and start putting them back together into larger pieces.
So, what I'm going to do here is get started on gluing up a bunch of the panels that we're going to need.
So, I have two pieces here for one of the sides for our bookcase.
And we have the edge that's going to be glued together, jointed.
What you will notice is a couple of spots on here that didn't get planed.
So, there's one here, one down on the end.
Some of that's going to get cut away when we cut these pieces to final length.
Also, we're going to run the panels through the planer as well to remove any glue that squeezed out and to level the joint.
So, I'm not too worried about those minor dips in there.
So, what I want to do now is I'm going to flip the two pieces on edge, revealing our glue line, and I'm going to glue them together using liquid hide glue.
The color of the liquid hide glue, as you'll see, matches really well with this kind of brown-colored bur oak.
Liquid hide glue also has a really long open and working time, so that way I can have plenty of opportunity to keep the boards aligned as I start tightening down the clamps.
I'm going to run a bead of glue along both boards and then spread it out with a brush.
Alright, now to clamp the two boards together.
You notice that I have them raised up on some scrap pieces here.
And that's so that I can apply these bar clamps, both from above and below, to balance out the clamping pressure so I don't end up with, like, a cupped panel in the process.
I'm going to begin at the middle, applying a clamp.
And if I need to, press down just to keep that joint line nice and flush.
Now I'm going to start working my way out towards the ends.
And now I'm going to alternate and come from below.
And what you want to see when you apply the clamps is a very thin bead of glue squeezing out to show that I have good clamping pressure all along the whole length of the glue joint.
Now it's just a matter of waiting for the glue dry.
But while we're doing that, we can get started on the legs.
I know I said I'd be going to the legs next, but a change of plans happened, and I'm actually going to start off with the upper and lower rails that join the two side assemblies at the front of the case and make an opening for the door.
So, I have a narrower upper rail, a slightly wider lower rail.
It's going to get a arch cut into it in just a little bit.
In the original plans, these are joined to the legs with a mortise and tenon joint.
I'm going to show a different option here, where we're going to drill a pair of pocket holes on the inside face of the upper rail, and then three holes on each end of the lower rail in order to make that connection.
So, what I want to do is, I already have it labeled, what's the outside face.
So, I'll put that to the back of the jig.
Line it up, clamp it in place.
Then I can use the cordless drill and a stepped drill bit to drill a pair of holes in one end.
Unclamp it, flip the piece around, and then drill the holes on the opposite side.
Same thing holds true for the lower rail, but this time I'm going to use all three holes in the drilling guide and make a set on each end.
The upper rail stays square and rectangular, so we're done with that piece.
On the lower rail, I laid out an arc profile and then rough cut it over at the band saw.
However, the band saw leaves noticeable blade marks on there, so I usually stay just a little bit outside of the layout line.
So, I want to smooth that out.
I'm going to use a spokeshave.
This one has a slightly curved bottom to it that will help it follow that profile.
I'm going to hold it at an angle to the rail.
And I can work in one direction, going downhill to the bottom of the cut, and then come around from the opposite direction... ...and clean up that edge.
It's not your only option, though.
You can also use a file.
This one has a half-round shape to it.
One side is rounded.
And you can do the same thing.
Basically, what you're looking for is to create a nice, smooth shape.
Not many people are going to feel the underside of the rail, so if it looks good from the front, it is good.
Your final option is to take that waste piece from cutting the curve, and then just cut out a section of it and put a little adhesive-back sandpaper on there.
And now what you have is a perfectly matched... ...perfectly matched sanding block that you can use to smooth out that entire profile.
Just peel off and step up to higher grits to however far you want to go with this.
Our little detour with the rails is complete, so now we can turn our attention to the four legs.
We have the blanks here, all ready to go, sized to their overall length and width.
You'll notice that the legs are glued up from two thinner pieces of wood, in order to get that thickness that we're looking for.
And the next step is to figure out where these legs are going to go.
So, one of the things that we want to do is keep any defects or less desirable grain patterns to the inside or to the backs.
So, for example, these two legs have some weird little knots on the back side that can be a little bit distracting.
So, we're going to put those on the back face, so they'll be facing the wall.
Nobody's ever going to see them.
And then I've also labeled them to make sure that as this construction process goes on, that they're going to stay in their proper orientation.
What I'm going to do now is use the template to trace out the shapes on the front two legs, and then it's time to go over to the band saw and rough-cut these long tapers.
With a little practice, you can get pretty close to the layout lines.
And that's what you want because it's going to make cleanup a lot easier.
I'm doing that here at the bench.
On the short tapers, I have a block plane here that I can use.
What I'm doing is just working down to my layout line and then going for a nice, smooth surface there.
Even if I shoot past the lines a little bit, that's what I'm looking for.
Now, on the long tapers on the opposite side, I'm going to use -- I can use the block plane, but I'm going to use a larger, longer plane, which will help me keep a straighter edge.
And again, I'm going to work from one end... ...down to the other.
And what you can see are these shiny spots here where the plane is cutting and then the blade marks in between.
Again, I'm just going for a smooth, even, straight surface here, rather than specifically looking for the layout lines.
Connecting the panel with the two legs to make up a side assembly is a long grain glue joint.
However, none of the surfaces are aligned flush, so trying to just glue this up would be pretty challenging.
What we're going to do instead is to connect the pieces using biscuits, and those biscuits will then hold the panel in the proper orientation and alignment to each of the legs.
Here's how it works.
I'm going to position the panel and the legs so they're flush at the top.
And then I just need to mark center lines.
So, I'll find a location where I want to put one of the biscuit slots and mark that on both sides.
And then I'll use a biscuit joiner to cut a slot in both the panel and the leg.
There are a few steps along the way that got us to this point, with the case assembled.
Now, I had to take the two back legs over to the router table, and then with a series of stopped rabbets, cut a rabbet on the back side so that we could slip the back panel into place as one of the last assembly steps.
From there, what I also needed to do was to cut a few more biscuit slots.
These are into the ends of the case bottom, and then on the lower part of the case side panel pieces.
At that point, we can get out the glue and the clamps.
And I started by creating end assemblies, two of them here, with a pair of legs, with the panels in between.
You're going to run a bead of glue down one of the legs.
Make sure you get some glue into those biscuit slots.
Fit the biscuits in place, then set that panel in.
And then you can do the same thing on the top edge of that panel now with another bead of glue, another handful of biscuits, and then that other leg.
Lay it all down and put clamps on it.
It's a little bit of a off-center assembly, so have clamps on one side and then balance out that clamping pressure with a few clamps on the other side.
And you'll do the same thing with the opposite side.
Give that a good hour or so to set up in clamps, and then you can bring those two assemblies together.
That's going to involve attaching the lower rail with the pocket screws, and then do the same thing at the top.
You'll also add glue and biscuits to get the case bottom into place.
Last thing that I did was to cut a plywood back panel, and the reason we went with plywood here is because of the fixed length of the two rails.
We didn't want to worry about any expansion and contraction issues.
A little bit of glue and some brad nails, and we're all good to go.
Well, it's time to make the door for the bookcase.
Now, there's always a couple of ways to make everything.
A lot of times we make doors, we make a frame, and then we go back in with a router and a rabbeting bit and create the little recess that a glass or panel might sit in.
We're going to do things a little different with this project.
We're incorporating the rabbet with all of our joinery steps, so it's a nice system.
Should be pretty slick.
We're going to start here at the table saw.
I've got my upper and lower rails, my two stiles and a center divider.
The first step is I'm going to cut the rabbet in the edge of each one of these.
So, I've got a dado set set up in the table saw.
It's buried in a fence.
And we're going to go ahead and start by rabbeting our parts.
Well, the next step in making our door is to cut one face of the tenons.
So, I've got what will be the show face of my rail here.
I've got it down on the table saw, and I've got my fence set at 1 inch, so we'll cut a 1-inch face.
After we get done with that, we're going to head to the drill press and we're going to start cutting and forming the mortises.
We'll meet back at the table saw, and I'll cut the other face, but I can sneak up on that face and get just the right width of the tenon, because I'll then have a mortise to fit it in.
Well, here's all the parts for our door.
Let me show you what I was doing on the table saw before.
So, we've got this face cut on our tenon, and I've got a lower shoulder and upper shoulder.
And things come together like so.
And you can see that the rabbet for our glass is right in place.
It's super easy.
Makes for a nice glue up.
Makes for a easy-to-make door.
So, let's start gluing things up.
First thing I want to do is I want to start with the center part here, this divider.
I'm going to put glue on all surfaces.
Press those in place.
Alright, with everything glued up, next thing, let's make sure that this is square.
A lot easier to correct a problem now than when the glue dries.
Check on the outside.
We're going to check the inside.
Check it a couple different places.
Everything's looking pretty good.
I think we're good.
So, let's let this dry.
When it is, I'll be ready to fit it to the cabinet and put some hinges on.
Once the clamps came off the door that Chris made, I trimmed it to size so that we could have an even reveal all the way around.
It's hung on some no-mortise hinges that I attached on the side there.
Inside the door, I added a magnetic catch to keep the door closed.
The door and the case are the primary elements of this project, but they're by no means the rest of it.
There are a few other details that we needed to take care of.
To start with, I made some corbels that are attached, two on each side.
I had a blank where I could cut two of those from each blank.
Did that over at the band saw.
Now, these corbels have a lot of end grain showing, so I just did sanding using a spindle sander at the drill press.
Some hand sanding would work here.
I didn't think that a router would work as well.
Then they're just glued in place.
The top of our project is a glued-up panel, and it works along the same lines as the way Logan was working earlier with the rough sawn lumber.
Parts were planed to thickness and then glued up into a wide panel.
However, there is a detail along the front edge.
You can see this little notched cutout with rounded corners.
Now, I shaped that primarily by cutting away most of the waste at the band saw.
Then I used an MDF template, a router, and a flush trim bit to shape and smooth out those details.
However, I do want a nice, sharp corner in here, and for that there's no substitute to a little chisel and mallet work to get that done.
A backsplash along the back edge of the top kind of caps off this whole project.
Then, on the inside, you'll notice that there are three adjustable shelves.
They rest on shelf pins that fit into sets of holes that I drilled on the inside.
A jig works really well here to be able to index and drill them so that they're all spaced evenly throughout.
♪♪ ♪♪ About the only thing that this project needs is a good finish.
Logan has a great recipe for craftsman projects like this.
The video for that is on our website, WoodsmithShop.com.
That's also the place to find plans for projects like this and other ones that we've featured on the TV show.
It's also the place to find videos and techniques to help you become a better woodworker, and to keep you busy until we gather right back here for another episode and another project on "The Woodsmith Shop."
♪♪ ♪♪ ♪♪ If you'd like to get more video tips and techniques, sign up for the free weekly Woodsmith eTip.
Every week, you'll receive an e-mail with a video tip to get more out of your table saw, router table, and more.
Sign up at WoodsmithShop.com.
Everything in today's show comes from the newly expanded Woodsmith Guild Edition with shop projects, plans, tips, and techniques.
To get a free preview issue of the Woodsmith Guild Edition and a free Woodsmith book, go to WoodsmithShop.com.
In addition, past seasons of "The Woodsmith Shop" are available on DVD, or you can watch them online from your computer, tablet, or mobile device.
For more information, go to WoodsmithShop.com.
Announcer: Major funding for "The Woodsmith Shop" has been provided by... Old Masters -- offering wood stains and finishes for the woodworking enthusiast and professional.
And by... Kreg -- from the first cut to the final assembly, providing woodworkers with products that help to simplify woodworking challenges.
Kreg.
Additional funding provided by... ...Titebond Wood Glues -- the pro's advantage.
And by...
Here at Grizzly, woodworking isn't just our business, it's our passion.
We love what we do.
Thank you for the opportunity to support "Woodsmith Shop" TV.


Support for PBS provided by:
Woodsmith Shop is a local public television program presented by Iowa PBS