Shop Storage
Season 18 Episode 1804 | 26m 46sVideo has Closed Captions
The power tools in a workshop tend to accumulate extra gear: bits, blades, wrenches, insert plates …
The power tools in a workshop tend to accumulate extra gear: bits, blades, wrenches, insert plates … Phil and Chris tackle the issue with a couple of wall organizers. They make one for the router and another for the table saw.
Problems playing video? | Closed Captioning Feedback
Problems playing video? | Closed Captioning Feedback
Woodsmith Shop is a local public television program presented by Iowa PBS
Shop Storage
Season 18 Episode 1804 | 26m 46sVideo has Closed Captions
The power tools in a workshop tend to accumulate extra gear: bits, blades, wrenches, insert plates … Phil and Chris tackle the issue with a couple of wall organizers. They make one for the router and another for the table saw.
Problems playing video? | Closed Captioning Feedback
How to Watch Woodsmith Shop
Woodsmith Shop is available to stream on pbs.org and the free PBS App, available on iPhone, Apple TV, Android TV, Android smartphones, Amazon Fire TV, Amazon Fire Tablet, Roku, Samsung Smart TV, and Vizio.
Providing Support for PBS.org
Learn Moreabout PBS online sponsorship[ Saw whirring, theme music plays ] ♪♪ It's time for another episode of "The Woodsmith Shop."
Now, after building a few furniture projects and gifts, I always come up with some ideas to help improve my workshop, whether it's to organize things or help the process move along easier.
On today's episode of "The Woodsmith Shop," we're doing that for two of our favorite tools in the shop.
One is our stationary table saw.
And we need a way to be able to organize blades and throat inserts and a lot of the other safety gear that goes with using the table saw safely and accurately.
So Chris is gonna build a wall-mounted table-saw cabinet that's made out of plywood and has a lot of really cool features in it.
Once he's done, I'm gonna tackle making a router storage cabinet.
Now, when you think routers, you're thinking about all of the bits that you need to store.
And this cabinet does that.
But there's a lot of other gear you need to organize as well, and we'll address some of those storage solutions too.
And if you're ready to build one or both of these projects, the plans are at our website, WoodsmithShop.com.
And right now, it's time to build.
Announcer: Major funding for "The Woodsmith Shop" has been provided by... Old Masters.
Offering wood stains and finishes for the woodworking enthusiast and professional.
♪♪ And by... Kreg -- From the first cut to the final assembly, providing woodworkers with products that help to simplify woodworking challenges.
Kreg.
Additional funding provided by... ♪♪ Titebond wood glues -- the pro's advantage.
♪♪ And by...
Here at Grizzly, woodworking isn't just our business.
It's our passion.
We love what we do.
Thank you for the opportunity to support "Woodsmith Shop" TV.
[ Theme music plays ] ♪♪ ♪♪ Well, the first step in building the table-saw cabinet is going to be to start with the back.
And the back has a few things going on with it.
We need to cut it to size.
There's some dados for the top and the bottom.
There's stopped dados for shelves.
There's angled holes for little holders for different table-saw accessories.
So a lot to do, but we start with cutting it to size.
I'm using Baltic birch plywood.
It's attractive.
It's strong.
It's pretty consistent.
I've got a plywood blade for my saw.
So let's get started and cut it to size.
It's time to cut the two dados for the top and the bottom on our back.
I'm gonna use the router table.
Now, I'm using Baltic birch, so it's about 11/16 inch thick.
I'm using a 3/8-inch bit in my router table, and I'm gonna do it in two passes.
And I'm gonna kind of sneak up on that final pass to make sure I've got a good fit.
So let's start with our first pass.
I'm gonna reset the fence and then we'll work with getting that perfect fit.
My second dado was in a slightly different position, so I'll start the process over and repeat to get it in the right location and the right width.
Next up, it's time to cut the stopped dados for the shelves.
Now I have two dados laid out here, and I've got my plunge router and I've got a 3/8-inch bit -- the same one that I used in the router table for these full-length dados.
Because we're using an 11/16-inch-thick material, I'm gonna do it in two passes and sneak up on that full width.
Let's go and get started.
Since I'm at the bench, I thought it'd be a good time to go ahead and radius the corners.
I've got them all marked in a one-inch radius, and I'm gonna use a saber saw to nibble off the wood and a sanding block to clean things up a little bit.
At the bottom of our back, there are five holes.
And those holes are angled at 15 degrees.
Those holes will receive a little piece of dowel, and that dowel, we can hang accessories and items on.
So how do we get 15-degree holes?
I really couldn't bring this piece over to my drill press and use the angle on the table.
There just wasn't enough distance between the bit and the column.
So instead what I did was just cut a scrap of wood at 15 degrees, and I'm gonna eye it.
I'm using a brad-point bit, and that's important because it's got that nice point on there.
And that allows me to put the point directly on my hole and angle the drill bit back and still have it follow the line nicely.
So I'll just visually sight that 15 degrees... make sure I'm holding it vertically this way.
And you'll notice I've got a piece of blue tape on the bit.
I made a couple practice holes, and I know that my bit's not gonna break out the back side.
That's all there is to it.
To cut the top, bottom, case sides, and shelves, I'm gonna rip a couple pieces of plywood at 6 inches wide, and then I'll just use my miter gauge, mark, and cut them to length.
Well, after finishing up the back, I've added a few more parts to our project -- a top, a bottom, left side, right side, and two shelves.
What we're gonna be up to now is we're gonna go to the router table, and I need to put a dado in the top and the bottom.
We just finished up cutting these dados on the top and the bottom.
And now it's time to cut this tongue.
You can see I've cut it on a sample piece.
I've got my 1/4-inch bit about a half of an inch up and right snug against the fence.
That's how we'll do it.
Before we glue up our case, one of the things I need to take care of is making sure that there's a shallow rabbet that fits the leaf of the piano hinge.
It's going to hold the door on.
So you see on my sample part here -- I've already done a test, and I have the leaf of the hinge flushing out the surface and the knuckle showing up just a little bit above the edge.
I have the router bit raised to the width of the leaf of the hinge.
I've got it hidden back behind the fence a little bit.
So just maybe 1/32 is showing.
We're ready to go.
All right.
It's glue-up time.
So I'm gonna start with the bottom.
We got lots of glue area here, so I want to use enough glue, but we don't have to have it squeezing out everywhere and making a big mess.
I think I also want to put a little bit of glue in my two dados while it's kind of handy here.
♪♪ ♪♪ All right.
There's the top and bottom and the sides.
So now let's put the two little shelves in place.
While the glue in the case work dries, I thought it might be time to go ahead and start with the doors.
There are two doors in this project.
One is the outer door, which will be held on with the piano hinge, and the other is the inner door, which there'll be some dowels which we can place saw blades, dado blades, things like that.
Each of the doors has a cutout as a handhold, and that's what I want to take care of right now.
I'm gonna use a saber saw with a fairly narrow blade.
We'll get that cut out, clean it up a little bit with some sandpaper.
And then on the inner door, we also have some 1/2-inch holes to drill.
They're at 15 degrees again.
And we use that same technique we used earlier with those 3/8-inch holes on the back of the cabinet.
One of the features we wanted to add to the inside of the main door is a convenient pocket for our inserts for our table saw.
Now, all inserts are gonna be a little bit different, right?
So what I'm gonna do is I'm gonna start with the this 6x12 piece of wood.
And I'm gonna make some layout lines.
I don't have to be too exact about it.
I just need to be consistent.
And... with those in place, that's gonna be kind of a border, an outside border, for me just to lay these two inserts... ...right up against those lines.
With them in place, I'll go ahead and trace around the outside.
Now, why am I going to all this trouble?
Well, if we make the pocket just wide open, those inserts are just gonna flop all all over the place when we open and close the door, and it's gonna be kind of annoying.
I'm also gonna go ahead and round over my corners, and I'm just gonna use a template here.
And I'm just gonna go ahead and mark a fairly generous outside radius just to make it look a little softer.
It doesn't have to mirror the radius of your inserts at all.
All right.
With that done, I know I need to clip off my corners and I need to remove the interior of each of these pockets.
So I'll use my saber saw and take care of that.
All right.
With this cut out, I'm gonna sand it smooth, check the fit of my inserts, then I'm gonna glue a piece of 1/4-inch plywood on top.
And I'll go ahead and clip the corners, get everything nice and smooth, and it'll be ready to install on our door.
One nice detail I'd like to add to our cabinet is a simple round-over.
I'm gonna round over this edge, and then the corner of our shelves on the top and bottom.
Now, one thing I have to watch out for when I rout them is that I don't blow out the veneer, since we are using plywood.
To keep the veneer from blowing out, I've clamped a scrap piece of MDF on the entrance and the exit of the cut.
Well, now it's time to add some dowels into those 15-degree holes we drilled earlier.
So I'm gonna go and start with those 3/8 dowels that go into the main case.
So now we're gonna go ahead and glue these 1/2-inch holes into the inner door... ...that the saw blades can be hung on.
So I've got two on this side, and then there's three on the other.
Prop it up on some of those scraps that I have.
There we go.
And next up, as long as we're dealing with the doors, I'm gonna go ahead and glue the little caddy for our table-saw inserts in place.
Just have to remember that this glues to the inside of the door.
So make sure you orient the finger hole on the correct side.
♪♪ It's time for us to start dealing with doors.
This is the inner door, and it pivots inside the case on some little dowel pins.
So I need to drill some holes.
I've got the holes marked on the ends of the door, and I've got holes marked on our case.
I've got a piece of tape on my drill bit, flagging it for a 1-inch depth.
You could flip your drill-press table and use that.
But I'm gonna rely on a good eye, and I'm gonna drill this straight.
So now we'll deal with the case.
I've got my holes premarked.
I am using a piece of MDF to back up the drill.
That way, when the drill bit goes through, I'm not gonna tear up the veneer on our Baltic birch plywood.
I'm gonna add about two washers on the lower pin... ...so the door will not drag on the bottom of our cabinet.
Okay.
And as you can see, our door now pivots nicely on our wooden hinges.
Well, it's time to mount the door on our cabinet.
So what I've done is I've used my hinge and I've marked holes for the screws.
And I've gone ahead and pre-drilled those.
On our cabinet, if you remember, we put a slight rabbet for the leaf of the hinge on the inside of the side here.
I have those holes marked, and it's time to go ahead and drill them.
So I'm gonna drill those holes, and then we'll switch over to a Phillips bit and start putting some screws in.
Well, here's our completed project already in use.
As you can see, it's got lots of room for all sorts of little odds and ends that you'll probably want to have with your table saw.
Hearing protection, eye protection, the wrenches -- all that sort of thing.
So let's open it up and see what's inside.
Here's the table saw inserts, nice and orderly.
We've got saw blades.
Open up our inside door, and guess what.
Now we've got room for the dado set, the shims, everything you're gonna need.
I added these magnetic catches on the inside to securely latch the inner door and the outer door.
So this is a great project.
Why?
Because it's super useful and easy to make.
So think about making one for your shop.
When you add a router to your workshop, it's not just a single tool.
There's a whole level of gear and accessories, not to mention the bits that you need to find a place to store and organize if you're gonna be able to use it successfully.
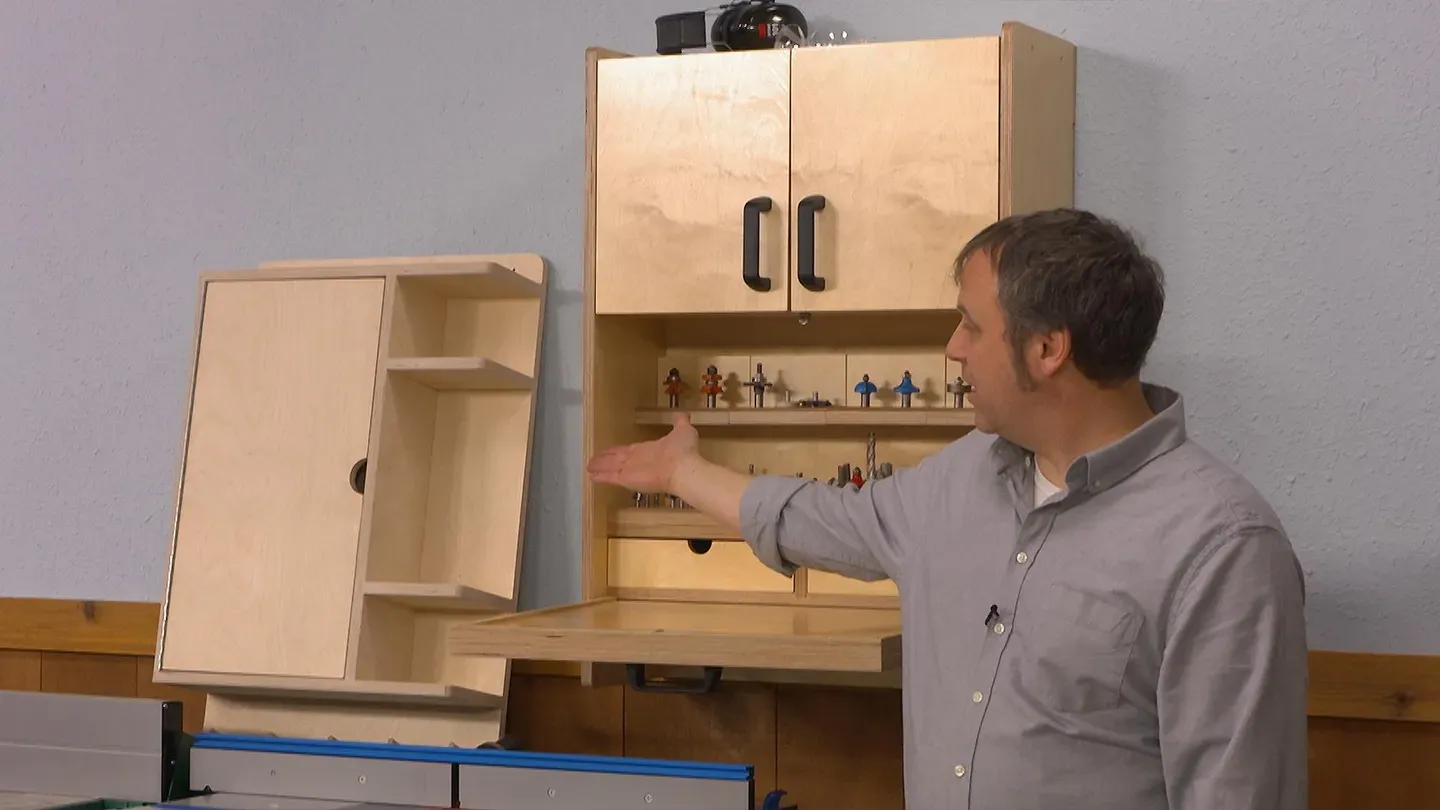
So what we have for the second project in this episode is the router storage cabinet here.
And you'll notice a lot of family resemblance between this and the project that Chris just made.
Now, it's made from Baltic birch plywood, though you could use other plywood if you wanted to.
And the construction is the same -- dados and rabbets -- and we'll get into that in a little bit.
But I want to show some of the features of it.
We'll start up top here.
There are a pair of doors that open onto a wide storage cubby.
So we can put an extra router up here, some safety equipment for use at the router table -- basically anything that you want, especially the bulky stuff that goes with a router.
Down below, instead of adding more opening doors, we have a tilt-down work surface.
So when you're changing router bits, you don't have to try and scrape off a place on your router table or your workbench.
You can do that right here.
There's a lip around the edge that keeps the small parts from your router bits from falling off.
Now, it's attached very similar to that inside door on the table-saw cabinet.
There's a hole drilled on the edge of the tilt-down door.
But instead of small wood dowels, we have some pretty stout metal pins here that hold on to the door.
On the inside is space geared primarily for storing router bits, and we do that in two ways.
The first is to make a tray or two on the inside.
This is made of a layer of plywood with some hardboard on top, and then drilled with an array of holes that are sized to be just slightly larger than the shank on the router bit.
Now, this one is set up for all the 1/4-inch bits -- 1/4-inch shank bits.
We have another one for the 1/2-inch shank bits.
Above that, some bits come kind of in sets.
And a good example of that is a rabbeting bit, where you get not just the bit itself, but a variety of extra bearings and a little Allen wrench so you can change out the bearing and dial in a different size rabbet with each cut.
So you want to keep all of that stuff together.
So we have a small rack here that's easy to take to the workbench if you're gonna use the router handheld.
And it has a hole... ...to accept the bit.
And then, for all the different bearings, we just used a smaller steel pin that's inset in there.
I'm gonna show you how to make these in a short time here.
On the backside, the rack has a beveled cleat, a French cleat, that hangs on a matching cleat that's installed on the inside of the cabinet case.
The best part with this project is you can customize the inside to match whatever storage system you want.
You want some more shelves?
You can just add those in.
Or if you want to go all with the rack system, you can do that as well.
There are even a pair of drawers here that have some custom inserts for wrenches and collets and things like that.
Like I said, there's just so much that goes along with your router that you want to have a space to be able to keep it all together and know exactly, when you're in the middle of the project, where to find it.
So let's get started building this.
Like I said, the joinery on this router storage cabinet is the same as the table-saw cabinet -- dados and grooves.
And Chris showed how to rout those dados with a handheld router and a simple straight-edge guide.
I'm gonna go with the same route.
I like using a router to do that.
But instead of the straight-edge guide, I'm gonna use a template here.
This one's made out of 1/2-inch MDF, and has a slot cut out in it that matches the size of the dados that I need for this particular project.
I've clamped it in place here, flush with the back edge of one of the side pieces.
Now, on this other side piece, you can see how I've just used a pencil to lay out the locations for all of these dados and then noting the position where they need to stop.
To work with this template, I'm using a compact router here, and the bit that I've installed is called a dado cleanout bit.
It has real short cutting flutes on there.
And what's more important is this bearing here.
That's gonna follow along the edge of the template so that as I go down and then back up one side, it's gonna follow right along that edge, creating identically sized dados no matter where I lay out the location of this template.
Once it's done, I'm gonna leave the template in place and then come back with a chisel and a mallet and square up the ends of the dado using the template as a guide for the back of the chisel.
When we're assembling the case for our router cabinet, the bottom corner and the top corner can be sharp edges that you can bang your knuckles against.
So what we want to do is round those corners.
On the table-saw cabinet, Chris is kind of a superhero and he can just cut that with a jigsaw, sand it smooth, and be done with it.
There is another way to do it, though, and that's to use a router template.
Now, the one that I have has sets of steel pins that register the template right on the corner.
To shape the corner, I'm gonna use a small router here, and it has a double-bearing flush trim bit on it.
[ Router whirring ] One of the cool storage features in this router cabinet are the hanging bit racks that we have on the inside.
Now, to make those, the process is pretty easy.
It starts off with two pieces of 3/4-inch plywood that are cut to the exact same size.
Now, on one of those pieces, I'm gonna glue down a layer of hardboard and attach that to the top.
That provides a little color contrast, because looks matter, and it also gives us a little extra depth so that when we drill the holes to accept the bits, we have a little bit more there to work with.
Now, once the glue on the hardboard is dry, I can go back over to the table saw and install a dado blade and run a groove near the back edge.
And I want that groove sized to match the thickness of the plywood here.
To install it in the cabinet, again, at the table saw, I made a couple of beveled strips.
One beveled strip goes on the back of the rack.
When you glue it on, you want to make sure that the bevel is facing the back here so that it's gonna interlock with a strip that's gonna be attached on the inside of the cabinet.
Now, gravity is just gonna hold it in place with those interlocking bevels.
The final bit of organization on the inside of our router storage cabinet are a pair of small drawers.
And what's nice about having drawers is that it's a good way to be able to organize really small things or having a place where you can customize the inside of it.
So in order to get the project done but still have that versatility, the drawers here are pretty simply made.
They're made out of 1/2-inch plywood.
And then, on the front and back, I used a dado blade at the table saw and cut a deep rabbet on each side.
And that's going to anchor and hold the drawer sides in place.
The other thing that I did is made that dado blade a little bit narrower and then plowed a groove on the inside face of all of the parts to accept a 1/4-inch plywood drawer bottom.
Now, assembling a drawer like this is pretty simple.
What I like to do is put a bead of glue right on that inside corner of the rabbet.
That's gonna minimize the amount of squeeze-out that I get.
And then a quick bead of glue... ...in the drawer bottom grove.
Fit the bottom into the front and back and then slide the sides into place.
The rabbets help square up and register all the parts.
I'm gonna apply clamps just to hold everything in place while the glue dries.
On today's episode of "The Woodsmith Shop," we focused on organizing the gear and accessories for two of our favorite tools -- the table saw and the router, and I wrapped up this router storage cabinet.
And it's all built with plywood.
You can easily cut pieces to size and then connect them using simple joinery, like dados, rabbets, and grooves.
On the inside of the router cabinet, we made quite a few custom storage solutions, from bit trays and special hanging bit racks.
And there's plenty of open spaces as well, like up above here, for the larger items.
If you're ready to build along with us, whether it's this router cabinet or the table-saw cabinet that Chris made earlier, the plans are at our website, WoodsmithShop.com.
You'll also be able to find quite a few other free plans there as well along with great woodworking tips and techniques to help you become a better woodworker.
And then we can gather right back here in the Woodsmith Shop and build another great project.
♪♪ ♪♪ Announcer: If you'd like to get more video tips and techniques, sign up for the free weekly Woodsmith eTip.
Every week, you'll receive an email with a video tip to get more out of your table saw, router table, and more.
Sign up at WoodsmithShop.com.
Everything in today's show comes from the newly expanded Woodsmith Guild Edition, with shop projects, plans, tips, and techniques.
To get a free preview issue of the Woodsmith Guild Edition and a free Woodsmith book, go to WoodsmithShop.com.
In addition, past seasons of "The Woodsmith Shop" are available on DVD.
Or you can watch them online from your computer, tablet, or mobile device.
For more information, go to WoodsmithShop.com.
Major funding for "The Woodsmith Shop" has been provided by... Old Masters.
Offering wood stains and finishes for the woodworking enthusiast and professional.
♪♪ And by... Kreg -- From the first cut to the final assembly, providing woodworkers with products that help to simplify woodworking challenges.
Kreg.
Additional funding provided by... ♪♪ Titebond wood glues -- the pro's advantage.
♪♪ And by...
Here at Grizzly, woodworking isn't just our business.
It's our passion.
We love what we do.
Thank you for the opportunity to support "Woodsmith Shop" TV.


Support for PBS provided by:
Woodsmith Shop is a local public television program presented by Iowa PBS