Tagine and Hummus
1/2/2021 | 24m 23sVideo has Closed Captions
Host Julia Collin Davison makes a fabulous Moroccan Fish Tagine.
Host Julia Collin Davison makes a fabulous Moroccan Fish Tagine, ingredient expert Jack Bishop tells you everything you need to know about buying and storing spices, and test cook Becky Hays whips up Ultracreamy Hummus.
Problems playing video? | Closed Captioning Feedback
Problems playing video? | Closed Captioning Feedback
America's Test Kitchen is presented by your local public television station.
Distributed nationally by American Public Television
Tagine and Hummus
1/2/2021 | 24m 23sVideo has Closed Captions
Host Julia Collin Davison makes a fabulous Moroccan Fish Tagine, ingredient expert Jack Bishop tells you everything you need to know about buying and storing spices, and test cook Becky Hays whips up Ultracreamy Hummus.
Problems playing video? | Closed Captioning Feedback
How to Watch America's Test Kitchen
America's Test Kitchen is available to stream on pbs.org and the free PBS App, available on iPhone, Apple TV, Android TV, Android smartphones, Amazon Fire TV, Amazon Fire Tablet, Roku, Samsung Smart TV, and Vizio.
Providing Support for PBS.org
Learn Moreabout PBS online sponsorship♪♪ ♪♪ ♪♪ ♪♪ ♪♪ -Welcome to "America's Test Kitchen" at home.
Today, I'm making an easy but elegant Moroccan fish tagine.
Jack's going to tell us all about buying and storing spices.
And Becky's making an ultra-creamy hummus.
We've got a lot in store today, so stick around.
♪♪ To me, cod is like the boneless, skinless chicken of the sea because it has a mild flavor that really benefits from a recipe that packs a punch.
A lot like a Moroccan fish tagine, which is what I'm going to show you how to make today.
Now, I like serving tagine with a little bit of rice in the bottom of the bowl to catch that sauce, so I have some basmati cooking in the rice cooker back there.
And the other thing about a tagine is there's one key ingredient that you have to include, and that's preserved lemons.
Now, you can buy preserved lemons at a nice, well-stocked market.
You can make them, although it takes a few weeks for them to marinate and ferment.
Or you can use this really quick recipe I'm about to show you.
It takes only 24 hours for the lemons to really soften, and they can hold for up to two weeks.
Alright.
So here I have two lemons and I already washed them.
Washing the lemons is crucial because you're going to use the skins as well, so you want them to be nice and clean.
And I'm going to trim off the edge here.
I'm going to use a mandoline to slice them as thinly as possible.
Now, really, you can't slice them thinly enough by hand.
Just going to slice these nice and thin.
They're going to start to break apart.
And that's okay.
And watch your fingers.
Alright.
Here I have all these lemon slices.
To this we're going to add 3 tablespoons of sugar.
Now, sugar is not a traditional ingredient in preserved lemons, but in quick preserved lemons, it really helps mitigate that acidity.
We're going to add some salt, 3 tablespoons of table salt.
And last but not least, some olive oil.
Now, olive oil is also not traditional, but that oil will help soften the skins overnight.
So that was 3/4 of a cup of extra virgin olive oil.
Stir this around.
Get it really nicely combined.
So I'm just going to take the lemons and pack them into the jar.
Now, we do have a recipe for traditional preserved lemons that take about 8 weeks to ferment in the fridge, and you can find that on our website.
So here are some preserved lemons that are ready to go, and we only need two tablespoons of these chopped up that we're going to add to the pot.
Little goes a long way with these guys.
Just going to chop these up nice and fine.
Yeah, that looks like 2 tablespoons.
Might be a bit heavy, but I like the flavor.
Set that aside.
Now let's work on the vegetables.
There aren't a lot of vegetables going into this tagine.
Just an onion, a bell pepper, and a carrot.
So we're going to cut these all the same way -- lengthwise into nice strips.
Going to start with the onion.
Cut it in half, and that's when I like to peel it.
So I'm gonna slice off that root end, and now I'm just going to slice all the way around pole to pole, but I'm going to angle the knife as I go.
Now, when I get about halfway, I like to tip that onion back on its other side.
It's just easier.
That's an onion.
Onto the bell pepper.
Now, to do the bell pepper, I'm going to cut off the top and the bottom.
Save those.
We're going to use them.
Slice down through one side and then open it up.
And that's when you can easily take out the core and all those seeds.
Then we're going to go in and trim away some of those ribs using a knife.
Now, this is when your fingers get in the way a little bit, so just be careful.
Alright, so now that I have these flat pieces of pepper, it's easy to cut them into nice, thin strips.
Now for the tops and the bottoms.
I don't like wasting anything, so I'm just going to slice them as well.
Last but not least, one carrot, which we're also going to slice thin.
Of course you have to peel it first.
Put the carrot on a solid surface of a board.
It makes it really easy to peel really quickly.
For the carrot, we're going to cut it on the bias so the carrots have a nice elongated shape, and that's it.
Last but not least, I have 1/3 of a cup of green pitted olives.
And it's these two ingredients -- the green olives and the preserved lemon -- that are the classic flavorings in any tagine.
Here I have 1/3 of a cup of pitted green olives.
And if you can find picholine olives or cerignolas, those have amazing flavor.
But really, any good-looking green olive will work well.
So now I'm just going to cut these into quarters.
Alright, with all the veg prep done, it's time to focus on the star of the show -- the cod.
So here I have 1 1/2 pounds of cod.
Ooh, look at this beauty.
Now, this is a beautiful fillet.
Not a lot of prep we have to do here.
It's already boneless and skinless.
We're just going to cut it up into nice stew-sized pieces, about an inch and a 1/2 to 2 inches.
Cut it lengthwise.
Then cut it into nice big chunks.
The only prep we need to do to this fish is to season it with a little salt.
This is 1/2 a teaspoon of table salt.
And that salt is going to do two things -- It's going to season the fish, but it's also going to help that fish stay moist during cooking.
We just need to let this fish sit while we start a really important part of this recipe.
It's a spice paste known as a chermoula that's going to give the fish a lot of flavor.
And the first ingredient is cilantro.
We want to go for about 1/2 a cup, and we want to use mostly the leaves and the tender stems.
You don't want the thicker stems because we want this to be a pretty smooth paste.
So I'm going to add this cilantro right to the food processor.
Next, I'm going to add 4 garlic cloves.
And these are the ones that are already peeled, which I really love.
Now we're going to add the spices, and these spices are what makes the tagine really have flavor.
We're going to add a teaspoon and 1/4 of cumin, teaspoon and 1/4 of paprika.
Last but not least, a little cayenne, just a 1/4 of a teaspoon.
I'm going to put the lid on.
We're going to pulse this until it's finely chopped.
About 12 pulses or so.
Next in, want about a tablespoon and a 1/2 of fresh lemon juice.
I like to squeeze it right into the food processor.
Ooh, this is a good, juicy lemon.
Mmm.
Looking good.
Last ingredient is some extra virgin olive oil, just 2 tablespoons, and I'm not going to add it to the food processor with the blades spinning because that can make that oil taste a little bitter.
Instead, I'm going to take it off and just add it by hand.
When you're all done, this is what the chermoula looks like.
It's finally minced, glistening with the oil and the lemon juice.
And it has a wonderful, fragrant smell.
Alright.
We're going to set that aside.
It is time to start cooking the tagine.
And what I have here is a Dutch oven heating up over medium heat with 1/4 cup of extra virgin olive oil in it, and that oil is starting to shimmer, so it's a perfect time to add the vegetables.
Add them to the pot along with a little salt.
Just 1/4 teaspoon of salt.
We're just going to let these cook for 5 minutes or so until they soften.
Now, the word tagine actually refers to two things.
First, it is the cooking method where everything is cooked gently together in a pot, so it all gets flavored at once.
Second, it is the traditional cooking vessel.
It has that iconic look with that big lid.
And if you have one of those, by all means, you should substitute it for the Dutch oven.
These vegetables are nicely softened and it's time to add some tomatoes.
Now, this is a 14 1/2-ounce can of diced tomatoes and we're going to add it with the juice.
That juice is going to add nice liquid to the sauce.
In go the green olives.
Last but not least, we're going to add the preserved lemons.
Now, a lot of recipes have you add the lemons at the end for a fresh flavor, but because this cooks so quickly, we found it nice to add them to the pot.
That way it allows their flavor to bloom and really permeate through the sauce.
Alright.
So here's the fish.
And now we're going to add the chermoula to it.
We're gonna coat the fish with this nice flavorful paste.
And you really want to do this at the last minute because you don't want the paste to start to marinate the fish.
You just want to flavor the fish during cooking.
Alright.
So we're just going to put this cod on top of its bed of vegetables.
You want to put them in a single layer.
You don't want to stack the cod on top of one another.
Gonna scrape out any of the chermoula left in the bowl because we want all that flavor in the pot.
Alright.
Medium heat.
We're going to put the lid on.
We're going to let this cook for 3 to 5 minutes until it just starts to turn opaque and the juices come out and start to bubble around the edges.
This fish has been cooking for about 4 minutes.
Time to take a look under the lid.
Oh, you can see all that liquid that's come out of the cod and it's making a lovely sauce with all that juice from the canned tomatoes.
No reason to add any water or broth here.
There's plenty of liquid in the fish.
That looks perfect, so I'm going to turn the heat off and I'm actually going to let the fish finish cooking off the heat.
And that is key to ensuring that the fish doesn't overcook and start to fall apart.
And the way you know the fish is perfectly cooked is that it registers about 140 degrees on a thermometer.
This fish has been cooking off the heat for about 4 minutes.
Again, we're looking for a temp of about 140.
140.
Good to go.
Now, you don't want this to sit around.
You want to be able to serve it pretty much as it finishes cooking.
One last prep, a little bit of cilantro for the top.
So there is a bowl with the rice waiting.
Oh, nice big chunks of cod.
And this juice is one of the best parts of the tagine.
I like to drizzle it right over the top and let it soak down into the rice.
Alright.
A little bit of bright cilantro on top.
It's that easy.
Now for a taste.
Oh, the cod.
I love it that it holds together, but as soon as you put your fork to it, it starts to fall apart.
Mmm.
It has so much flavor.
I'm gonna dive down into that rice now, pick up some vegetables.
The carrots in this -- some of the best carrots you'll ever have.
Mm.
Mmm!
So if you want to make Moroccan fish tagine, remember three things -- first, use some preserved lemons.
You can make them or you can buy them.
Second, be sure to make your own chermoula with lots of cilantro and a few spices.
And last, cook the fish off the heat so it doesn't turn tough.
From "America's Test Kitchen" at home, a great recipe for Moroccan fish tagine.
♪♪ -Spices are often the difference between good cooking and great cooking.
Let's start with a definition.
A spice is any plant that you dry and then you eat.
So that includes the bark of an evergreen tree -- cinnamon -- rhizomes and roots, like ginger or turmeric.
Can be a flower like lavender or rose petals.
Berries -- peppercorns, vanilla.
Even herbs that we dry we call spices.
Enough with the botany.
Now let's start talking about some cooking.
So really good tip -- the most important thing is that your spices need to be fresh.
One or two years out, and they begin to lose a lot of flavor.
So you can try to guess -- I have 63 spices.
Yeah, I counted them -- in my cabinet or you can do what I do, put a date on them.
So it's very simple, when you get it home, put a sticker on and the date so that you know how old that spice is.
Do not use a spice rack on your counter next to the stove with a sunny window.
Spices do not like heat and light.
They belong in a dark cupboard.
You can put them in the freezer if you want, but they're fine in the cupboard.
Now, if you do not date them or you have any doubts, I've got some tests for you.
So we're going to call this the sniff test and the crumble test.
So the sniff test, I'm going to use for a ground spice like ginger, and it's kind of exactly what you think it's going to be.
I'm going to stick my nose in -- [Sniffs] -- and take a really big whiff.
And if you get nothing -- Actually, that was kind of a lot, so this is nice and fresh.
You kind of want to get a lot.
But if you get no aroma, you're going to get no flavor and you should start over.
Now for something that you feel like doesn't quite sniff.
There's not much here.
So I'm going to do the crumble test.
I'm going to put some in my hand, and then I'm just gonna basically crumble it with my fingers and see if I can release any flavor.
I would say there's a little bit of flavor.
Date on this is actually from 2019, so it's kind of old oregano.
It's not bad, it's not going to ruin my food, but the whole point of the spices are to elevate your food, and that's not going to happen.
Next up, ground versus whole.
We use a lot of ground spices in the test kitchen.
I use a lot of ground spices at home.
They're super convenient, but there are times when you want whole spices.
Now, if you're going to have whole spices, you're going to need a spice grinder.
Now you're thinking this is a coffee grinder, and, yeah, it's a coffee grinder that I dedicate to spices.
I actually have two of these -- one for coffee and one for spices.
This is mine.
I've had this at least 15, maybe 20 years.
The biggest thing is to just take care of it by cleaning it.
A damp paper towel will do the trick.
And if it gets really dirty and I'll show you -- mm, that's not the cleanest I've ever had it.
You can do a cleaning trick with rice.
This is brown rice.
You can use white rice, any rice you have.
This is basically an abrasive.
And you throw that raw rice -- this is obviously uncooked rice -- into the mill.
And now I'm going to turn it on.
Making a cocktail here.
I'm shaking, actually trying to get the grain underneath the blade.
Alright.
Let's see.
Alright, and the rice has gotten underneath the blades and gotten out a fair amount of the gunk.
That looks better.
One last tip -- there are going to be times that you're using whole spices that you don't want them ground, but you want them cracked, say, like black pepper for steak au poivre, or cardamom that's going to go into some oil to begin a curry recipe.
So the best way to do this is with a plastic bag, because otherwise they're going to fly all over your kitchen, and a heavy implement.
You can use a meat pounder or in this case, I've got a skillet, and just have some fun.
Oh, that's good.
Oh, that's good.
You don't want to go too far.
Actually, I'm probably in danger of ripping this poor bag, but get a lot of pressure on it and you can see them beginning to crack this.
So... spices, they're a workout, but they're going to make your food taste so much better.
Enjoy.
♪♪ -So you want to know how to clean a baking stone?
Well, I'm going to show you here with mine.
You don't.
You don't clean it.
It should look like this.
Breads, pizzas, rolls, baguettes have been baked on this stone for decades.
I've had this longer than I've had my husband, and all these marks on there, they are marks of pride.
So if your baking stone looks like this, you're doing something right.
♪♪ -I've always eaten a lot of hummus, but this recipe I'm about to make is next-level hummus.
It's really the best hummus that I've ever had, really and truly.
It starts with canned chickpeas.
I'm starting with two cans here, and I'm just going to give them a good rinse.
There's no shame in using canned chickpeas at all for this.
We tasted dried chickpeas, as well, and the canned were just as good and they're a whole lot faster.
We want them to get even softer.
This is going to help make a super-silky hummus, so we're going to cook them a little bit more.
Have 6 cups of water, and I'm also adding 1/2 teaspoon of baking soda.
The baking soda is going to raise the pH of the water and it's going to help all of those chickpea skins come off, and then we're going to get rid of those skins.
And I'll put this on the stove.
I'm going to bring this up to a boil, then I'll lower to a simmer.
We want to cook this for about 20 minutes, and then the chickpea skins will start floating at the top of the water and the beans will be nice and soft.
While these simmer, let's start with the other ingredients.
So I have 4 cloves of garlic that I'm going to mince up here.
I'm going to measure out one tablespoon of garlic and we're going to soak that garlic in some fresh lemon juice.
And the lemon juice will help to temper the bite of the garlic.
It deactivates an enzyme in the garlic called alliinase and it takes away that really harsh flavor without killing all the garlic's personality.
So I need 1/3 of a cup of lemon juice.
We're going to add the lemon juice and a teaspoon of salt, and we'll give that a stir.
We'll let this sit for 10 minutes.
We'll let the lemon juice work its magic on the garlic, and then the beans will be just about done in that time too.
♪♪ Alright, it's been 10 minutes and the lemon juice has taken the harsh bite out of the garlic, so we'll just strain it away here.
And this is nice, too, because we're not going to have any little bits of garlic in our hummus.
It's going to be silky, luxuriously smooth with nothing in there to take away from that.
Okay, I think my chickpeas are ready now, and let's see how they look.
You can see a lot of the skins have started to come off already, which is exactly what we want.
And you can see the chickpeas have started to break down a little bit, too, so that's perfect.
So I'm going to strain these.
We'll put these back into the pot.
Now I'm just going to run some cold water on the chickpeas.
This is going to cool them down, and the skins are going to start to float to the top.
And I'm just going to put my hand in.
It's cool enough.
I'm just going to give them a little swish.
All the skins start floating up to the top.
So I'm just going to pour those skins off, leave the chickpeas themselves behind, but try and get the skins off.
See how many came off already?
Okay, and then I'll do another swish.
So we're going to do this three or four times.
You don't need to get every last chickpea skin.
You want to get about 3/4 of a cup of them and that'll go a long way toward giving you a nice silky hummus.
Okay, perfect.
So all those skins just going to dump in the sink for now.
We don't need them.
Say goodbye to those.
I want to save a couple of nice, whole chickpeas for the garnish, so I'm going to pick out 2 tablespoons.
Okay, so time to make the hummus.
Let's put the chickpeas into the food processor.
And here is that garlicky lemon juice that we made earlier.
I'm also adding 1/4 cup of water, which is a really common addition to hummus.
It helps loosen it up a little bit.
And 1/4 teaspoon of cumin.
Not too much.
We just want the cumin to be really subtle in the background there.
Alright.
I'm going to whiz this up for about 1 minute.
Alright, that's been about a minute.
Let's take a look.
It's getting there.
Smells good already.
Okay, so now I'm going to add 1/2 a cup of tahini, and tahini is a really important flavoring in hummus.
So you want to make sure to look for one with a light color.
That means that the sesame seeds have been lightly roasted.
If you see a tahini that's dark in color, that means that it's been heavily roasted, and those tahinis tend to have a bitterness to them.
So we definitely prefer a lighter color.
And then I'm also adding 2 tablespoons of olive oil.
Now, not all recipes call for olive oil in the hummus, but we found that it really helped give us that really super silky, luxurious texture that we wanted.
Now, I'm adding the tahini after all the other ingredients.
And the reason I'm doing that is because the proteins in the tahini tend to absorb a lot of water.
So by mixing the water with the other ingredients, it makes it harder for those proteins to attach to water, so the hummus won't thicken up and get too sticky and clumpy.
Okay, so I'm going to let this go for another minute.
Alright, I think it's done.
So you can see that's pretty loose.
That might be different than the stuff you're used to buying in a tub at the supermarket, but that's what we want.
If your hummus is too thick at this point, you can add 1 tablespoon of water at a time to thin it out a little bit.
Okay, the hummus is done, so before we eat, I'm just going to prepare some goodies to go with it.
I have a couple of carrots, and I like to cut them on the bias into nice long pieces.
So you can eat your hummus with whatever you want.
You can have it just with pita, which is great.
I like to put a lot of veggies out, too.
I like to choose a lot of different colors.
Next up, I'm going to do some radishes, and I like to slice them in half like this.
And I like to leave the little tops on because they look pretty that way.
And now I have some Persian cucumbers.
They're nice and crisp, so I just like to slice these in half just like that because they just look gorgeous.
okay, then I have to have pita with my hummus, and I like the nice thick pita bread like this, and I'm just going to cut some nice wedges.
That's ready.
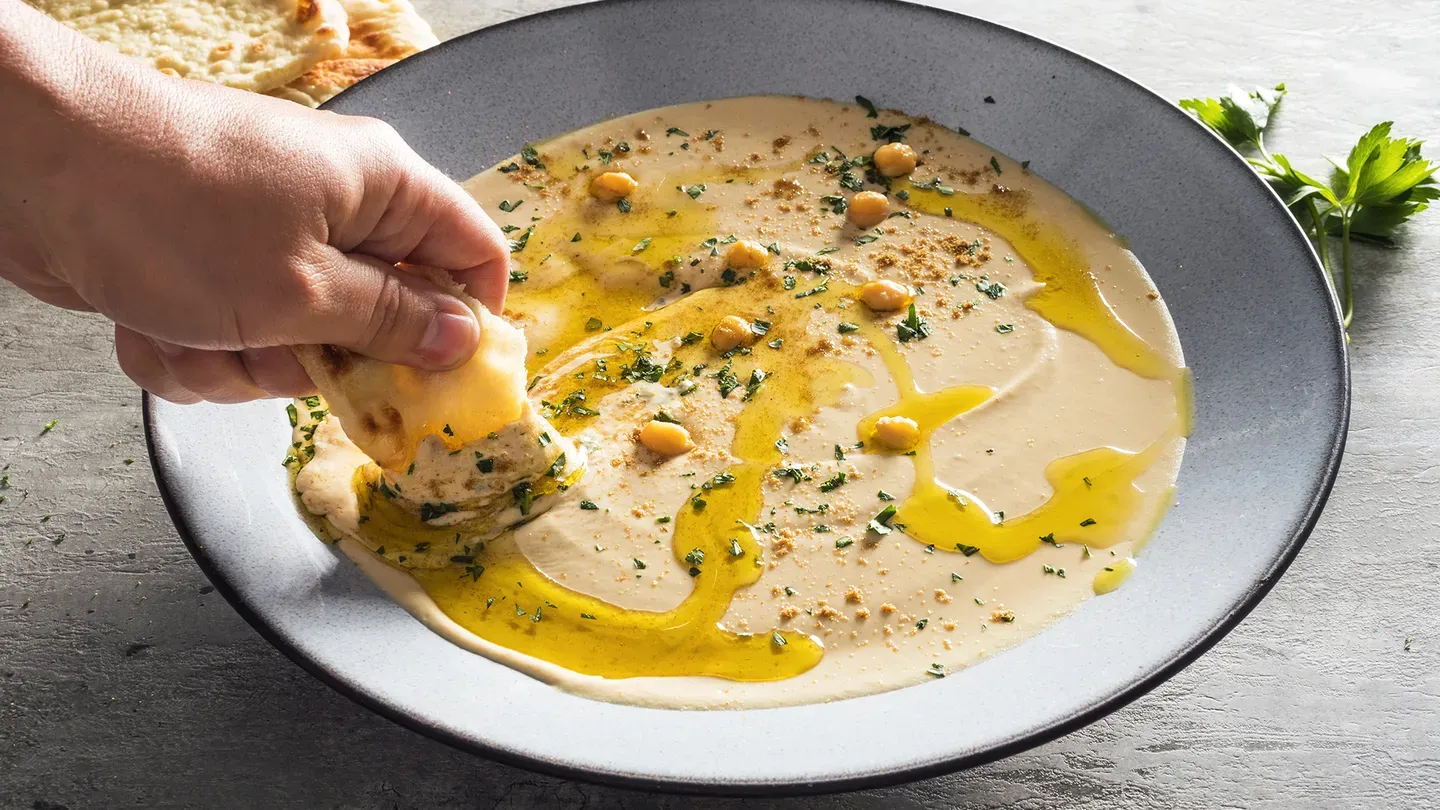
Now let's put our hummus on the platter.
You can see that silkiness, see how it just flows.
That's how hummus should be.
Okay, then I just like to take the back of a spoon and smooth it out a little bit.
It helps it look pretty.
Okay.
Now, remember those chickpeas that we saved?
Just going to put a couple of whole chickpeas on top for a nice little garnish.
Just a tiny little bit of cumin.
Ooh.
It's raining cumin.
Okay, same thing, I have a tablespoon of parsley.
I'm just going to give hummus a little sprinkle of parsley.
And now just a little drizzle of extra virgin olive oil just to finish it off.
Ooh.
I'm just doing a simple garnish today, but we have two other toppings -- a spiced beef topping and a spiced walnut topping.
They're both delicious, and you can find the recipes on our website.
Okay, it's time to try my amazing hummus.
I'm going to put some on a plate here.
And the hummus is still a little bit warm at this point, and that's the best way to eat it.
So don't think you need to chill it down.
It's delicious when it's still a little warm from the pot.
So I'm going to try it with a cucumber.
Mmm.
Mmm.
That is amazing.
It's perfect.
The garlic is very subtle, but it's there.
Tiny bit of cumin, and that texture.
Oh, this is really all I need for lunch.
I'm good.
I really hope you'll try this recipe.
If you do, remember to add baking soda to the cooking water, soak the garlic in lemon juice, and use a light colored tahini.
So from "America's Test Kitchen" at home, our best recipe for ultra-creamy hummus.
I'm gonna have some pita this time.
-Thanks for watching.
You can get all of the recipes from this season, along with our product reviews and more at our website, americastestkitchen.com/TV.


Support for PBS provided by:
America's Test Kitchen is presented by your local public television station.
Distributed nationally by American Public Television