Two Table Saw Jigs
Season 18 Episode 1811 | 26m 45sVideo has Closed Captions
In this show, Woodsmith Shop hosts Chris Fitch and Phil Huber build a pair of essential accessories.
The table saw sits at the center of many woodworking shops. In this show, Woodsmith Shop hosts Chris Fitch and Phil Huber build a pair of essential accessories: a versatile crosscut sled and a feature-packed tenoning jig.
Problems playing video? | Closed Captioning Feedback
Problems playing video? | Closed Captioning Feedback
Woodsmith Shop is a local public television program presented by Iowa PBS
Two Table Saw Jigs
Season 18 Episode 1811 | 26m 45sVideo has Closed Captions
The table saw sits at the center of many woodworking shops. In this show, Woodsmith Shop hosts Chris Fitch and Phil Huber build a pair of essential accessories: a versatile crosscut sled and a feature-packed tenoning jig.
Problems playing video? | Closed Captioning Feedback
How to Watch Woodsmith Shop
Woodsmith Shop is available to stream on pbs.org and the free PBS App, available on iPhone, Apple TV, Android TV, Android smartphones, Amazon Fire TV, Amazon Fire Tablet, Roku, Samsung Smart TV, and Vizio.
Providing Support for PBS.org
Learn Moreabout PBS online sponsorship[ Saw buzzing ] ♪♪ On today's episode of "The Woodsmith Shop," we're building two projects for the table saw, and we're gonna spend most of our time right here at what is one of the most central tools in many workshops.
We're gonna kick things off with Chris, building a tenoning jig made mostly out of plywood but fully adjustable to cut accurate joinery.
It's one of the things that a table saw really excels at.
So you can use it for tenons or half-laps, bridle joints, miters, and more.
And Chris is gonna show you all the steps to take care of that.
Then I'm gonna pick things up with another key task that you'll do at the table saw -- crosscutting pieces to final length.
And I'm making this crosscut sled.
It's got plastic laminate on the top and bottom surfaces for durability and ease of use.
It's accurate with a really long fence to cut long pieces and can even be adjusted for angles and miters.
If you're ready to upgrade your table saw, the plans for both of these jigs are at our website -- WoodsmithShop.com.
So let's join Chris in making the tenoning jig.
Announcer: Major funding for "The Woodsmith Shop" has been provided by... Old Masters -- offering wood stains and finishes for the woodworking enthusiast and professional.
And by... Kreg.
From the first cut to the final assembly.
Providing woodworkers with products that help to simplify woodworking challenges.
Kreg.
Additional funding provided by... ♪♪ Titebond wood glues.
The pro's advantage.
♪♪ And by...
Here at Grizzly, woodworking isn't just our business.
It's our passion.
We love what we do.
Thank you for the opportunity to support "Woodsmith Shop" TV.
♪♪ ♪♪ ♪♪ Our tenoning jig has three basic components -- a base, an adjustable support, and a clamping arm and bracket.
We're gonna start out by making the base.
There's a couple of operations that I need to do.
First off, I need to cut a dado for this piece of T-track.
When I'm done with that, I'll flip my piece over, and I want to cut another dado for this miter bar to engage the slot in our table saw.
♪♪ After that, I've got a little shaping to do back here, which I'll do with a drill press... ♪♪ ...and a bandsaw.
♪♪ And, finally, we'll end up cutting these four holes here for some carriage bolts, which will bind the base to our adjustable support.
With the woodworking done to our base plate here, it's time to put a few parts together.
First thing I'm going to do is take a piece of T-track.
And I've got it cut to length, centered my screw holes, and we're gonna go ahead and put that in place.
Now, if you'll notice, it sits proud of the plywood, and that's because it's going to act as a guide for the horizontal support for our tenoning jig.
Alright.
With that done, let's flip it over.
And in this dado here, I've got a piece of hard maple cut, and that is for a runner for our jig to track in the miter slot of the saw.
So, a little bit of glue.
♪♪ And I'll go ahead and clamp the ends.
Well, next up for us to assemble is the adjustable support.
A couple different parts.
First off, we have a base.
And the base I've cut to size, rounded the corners, and rounded some slots.
So a little router-table work there.
The slots align with the holes for the carriage bolts that we previously put in our primary base.
It also has a dado cut here which rides on the T-track.
There's a notch in the back here, and that notch holds this little part.
This is a piece of half-inch plywood.
It is cut to straddle the T-track.
And there's a threaded insert.
And that threaded insert will connect to our micro-adjust.
So this is kind of a neat little thing to add to our project.
Attaching to this base is our face.
And the face has a dado... which will go like so.
And then I've got two blocks to help things square up and stay strong.
I'm gonna start the assembly process by gluing one of our brackets and screwing it to my base.
I'll get both those in place.
Then I can apply glue to this dado, to the other side of the bracket, and finish screwing it all together.
Okay.
Now, the last thing we need to do is add that little block with the threaded insert.
And that just glues in place.
There we go.
So, I'll take that off in about 20 minutes, and we're ready to start on the clamp.
Well, moving right along with the construction of our tenoning jig, it's time to think about the clamping structure.
So a couple things happening here.
One is I've added a fence.
It is cut into the adjustable support here, and it's just held in with a screw, no glue, because we want it to be adjustable.
Then, off of this face, there's going to be a support block.
And that's what I'm working on right now.
It needs a little notch, and it needs a tenon on it.
And that tenon meshes with this plow in our support arm.
As you can see, there's the plow.
There's also a groove that I cut here on the router table, just like we did earlier.
And that is going to allow this arm to be adjustable to accommodate the positioning of our clamp.
We also have a T-nut here.
And that T-nut is going to accommodate a little shop-made clamp.
And it's super-simple.
It's just a bolt, a handle... and we've got two parts which form a foot.
So our task right now is that I need to go ahead and cut this tenon to fit in this groove.
So I've got a dado set set up, and let's go ahead and make it happen.
♪♪ ♪♪ Well, with the glue dry, it's time to wrap up the tenoning jig.
First off, I've put this piece of 5/16 all-thread in, and I use just two nuts jammed together and a ratcheting wrench.
Easy.
Pretty quick to do.
It fits right over our arm.
And we're gonna go ahead and add a knob and a washer a little bit later.
Right now we need to worry about our clamp.
And you can see that the clamp foot is all glued up.
It spins nicely on this bolt.
What I need to do is just go ahead and thread it through our T-nut.
And then in order to secure the knob, I'm gonna go ahead and put a nut on.
If I can get it started here.
There we go.
And I'm gonna use a little bit of a reinforced CA glue.
You can use epoxy, and I want to add a little bit on the threads there.
This is a 90-second set, so I don't have to panic about it.
I'll put the knob on.
And I want to hold the nut with some pliers and give it a good twist to jam the knob up against it.
And between that and the glue, I think we're in pretty good shape.
With our clamp in place, I can then put the arm onto the support... put a washer on our little piece of all-thread there.
And there we go.
You can see our clamp can slide back and forth to accommodate different widths of parts.
We can back it out or screw it in for different thicknesses.
And we got a winning jig for the table saw.
Crosscut sled is one of those great updates that you can make for any kind of table saw.
What it does is allow you to create more accurate crosscuts or even dados, depending on how you have it set up.
The issue is how you're gonna size the crosscut sled.
Now, you can make small ones for small pieces or big ones for large plywood panels.
We went with kind of an in-between size here, large enough to take about a 12-to-14-inch panel pretty easily.
You can still crosscut short pieces, but this sled has a few other options that help it to make even more accurate cuts.
Now, it operates only on one side of the blade on the table saw.
That means when you cut a piece off, that waste piece can sometimes fall down or kind of flip away as it gets caught by the blade.
This one has a landing pad, for lack of a better word, here to catch those waste pieces so they're not gonna go spinning away.
This sled allows you to crosscut pieces up to 3 feet long pretty easily, but for the even longer parts, I can loosen a couple of knobs on the backside, and there's an adjustable stop that goes out even farther, letting you tackle 4-foot and even longer pieces on there.
Along the front edge, there's a length of T-track here that allows you to have a couple of stops in place for easily managing multiple parts when you want to make them the exact same length.
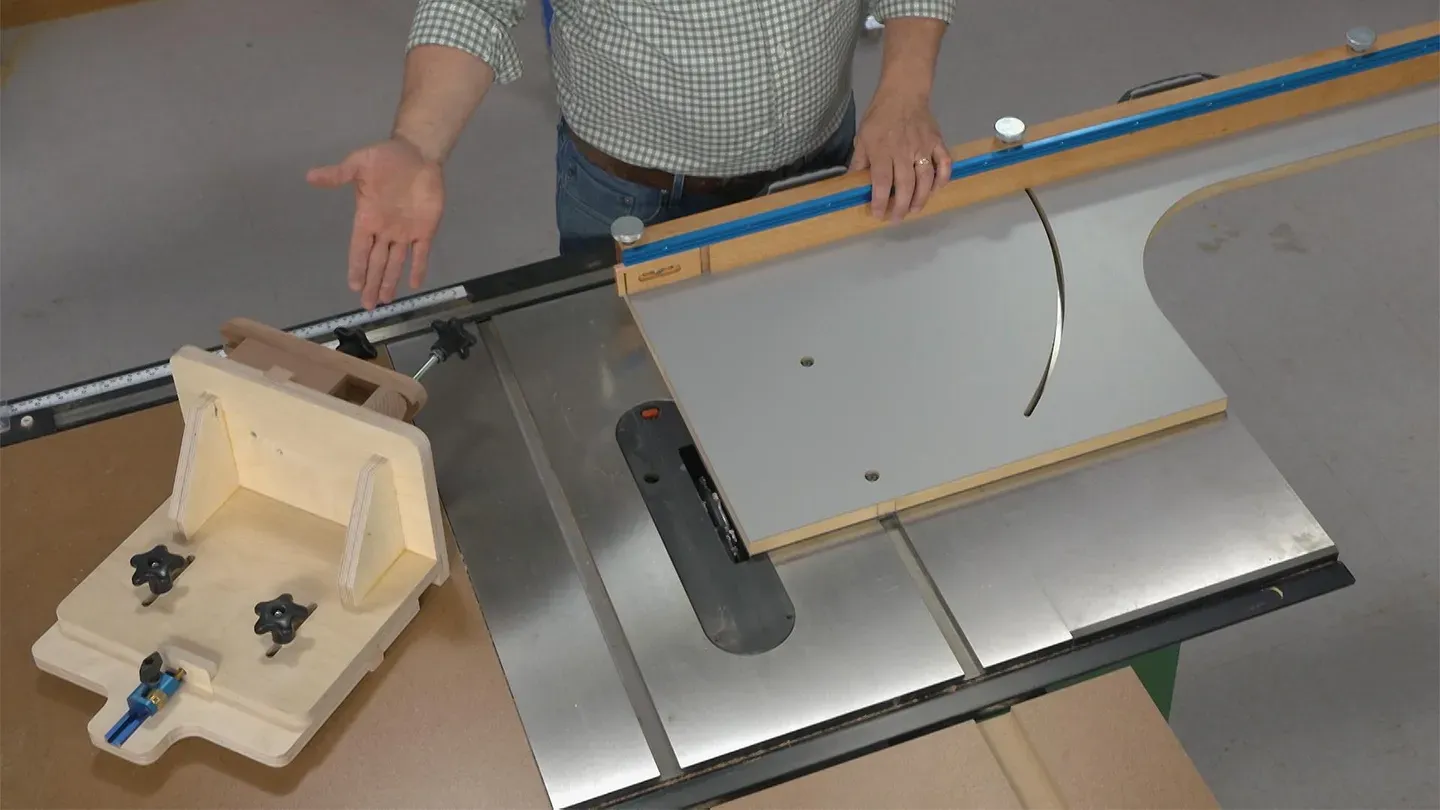
One of the most important details on this particular sled is this curved slot in the base.
What it does is allows me to... pull out a pin on one end... loosen these other knobs... and now we can set the fence to be able to make accurate angled cuts in a wide range of angles, all the way up to 45 degrees, pretty easily and accurately.
You also still have the use of any stops that you've attached to the fence and that extension stop.
So there's a lot going on here.
One of the things that you'll want to do, though, is make sure that you build the sled to match your table saw.
You can see the one that we have here was designed for another saw.
This offcut piece here doesn't come right up against the blade where I want it to.
Same thing with the edge here.
So, while you'll want to follow the plans -- they're at our website, WoodsmithShop.com -- you want to make sure that you size it to match your particular saw.
It's time for us to start building.
I have the two pieces that I need for the sled right here cut out of some 3/4-inch MDF.
I'm using MDF here because it has really nice smooth surfaces and is made reliably flat, so long as you keep it dry.
And that's what we want to take care of here, in one respect, by covering both faces of both the sled and the offcut support with plastic laminate.
Now, the plastic laminate that we're using, you apply to both sides because that's gonna keep the panels flat.
If it's only on one side, then moisture can get on that side, and it'll cause it to cup like a Pringles chip.
So what we're gonna do is apply laminate to both sides.
I have some oversized pieces cut for that already.
I'm gonna set this one off to the side.
What we're gonna use is spray contact adhesive.
And the way this works is that you put a coat on the backside of the laminate and on one of the faces of our sled part here.
We'll wait for that to dry and then line it up and stick it down.
Now, about the adhesive is that once the two pieces touch, they're down, so you want to make sure that you have everything aligned just right.
And it's also a good idea, like I said, to have the laminate a little oversized.
We'll trim it flush later on.
Oversized pieces of plastic laminate work great for aligning and getting the plastic laminate laid down.
You just need to trim it up now.
And the way to do that is to use a router with a flush trim bit.
So the bearing on the bit is gonna follow along our MDF blank.
The cutting edges are gonna remove all the material.
Now, unlike other routing, we can do this all in a single pass, even if there's quite a bit of an overhang on there.
It's so thin that you can just buzz all the way around, and then we're off to the races.
Once these are all trimmed up, we're gonna get started on fitting them to our saw.
For the next stage of the construction, I want to focus our attention on attaching the fence.
We'll build that in just a little bit, but what I want to do is start by drilling a few holes along what I would call the back edge of the fence.
That's for holding on the one pin down at one end.
This is where the slot is gonna be that will allow the miter -- the fence -- the miter gauge fence to rotate, to cut at angles.
And then this is gonna be the pivot point down here.
Now, you'll notice that I have pairs of holes drilled here, but that's not where we're starting.
Over at the drill press, I used a Forstner bit to rough out the holes on the bottom side first.
This creates a shallow counterbore to allow either a flange nut or a T-nut to fit into that opening for a nice, secure connection.
Once I'm done with the Forstner bit, then I can switch out to a brad-point bit to complete the through hole that will take care of things.
One of the ways to cut the arc in our base for the crosscut sled is to use a router trammel.
Now, the one that I have here is shop-made.
It's based around a long aluminum ruler.
It has an adjustable pivot point and then a base plate that holds the router in place.
I can take a pin and put that in a hole at the corner of the crosscut sled.
That's gonna fit into a hole on the bottom side of the pivot point here.
And then you can go by measurements off the plans, but I find it best to just lower the bit and drop it into the hole that we drilled earlier and use that as a way to set up the length and the adjustment for the router trammel.
What I'm gonna do now is make this in several passes.
I'll turn on the router and cut about 3/16 to 1/4 of an inch all the way up to a stop mark here and then repeat the process until I'm just about through.
And then we'll have to make a slightly larger groove on the bottom side.
To wrap up things for accommodating the fence, what I did is I used a router with an edge guide on it and connected the dots on the top side here with a straight bit, just making a couple of passes to add these little slots from the top.
That way, the fence will lock into its square position, and then you can release it in order to pivot it for angled cuts.
What's next is to lay out the final shape of our sled here, which I've done, and I'm gonna cut it to its size.
Ordinarily, this is something I'd do at the band saw, but this piece is just too big to accommodate on the band saw, so I'm gonna have to cut it with a jigsaw and then clean things up with a router and some filing and sanding.
The next stage here is fitting our crosscut sled to the saw itself, and that involves attaching a miter bar to it.
So what you want to do is line up the sled with your blade and then mark the location of the miter-gauge slot on the front and back edge of the sled.
And from there, we can mark the locations for the bolts and washers that attach the miter-gauge bar.
Now, the bar that we're using is pretty cool.
It's steel but also has some adjustment built into it so that you can dial in the fit, so, that way, the bar slides smoothly in the slot, but without any side-to-side play, which is gonna give you a much more accurate cut.
To make these holes, we're gonna do that over at the drill press.
I'll start with a Forstner bit, drilling a shallow counterbore that will accept the head and washer.
And then I'll switch out to a brad-point bit to punch through the through hole for the bolt itself.
We're pretty much wrapped up with things on the base of our crosscut sled.
Now we need a way to guide the workpiece, not just carry it.
And that falls to the fence, and it's made up of several parts.
The core of it is this long fence piece here made out of hardwood, and what we're gonna do is attach some T-track to the front and add a face piece on there.
But in order to accommodate that, I want to cut a shallow but tall rabbet using a dado blade recessed in an auxiliary fence here.
Now that we have the fence back complete, I added a length of T-track that's helpful for attaching stop blocks or hold-downs, things of that nature.
What it also does is create a ledge here, and I cut a piece to fill that space just below it.
It's eventually gonna get glued in place.
The key thing here is the thickness.
What you want is that face to be flush with, or just a little proud of the T-track in order to have a solid registration point for a work piece.
Before I glue it in, though, I'm gonna set up the dado blade here at the table saw and run a groove on the inside face, and that's gonna hold our extension stop that will allow us to cut really long pieces.
Alright.
Let's wrap things up here on this crosscut sled.
There are a few details that I want to highlight here.
The first is the extension stop that goes for making really long cuts.
It's a long piece of anodized aluminum.
And, then, the stop block is a piece of the same material that I used for the fence.
It has a shallow dado on the backside and held in place with a screw.
When you're using it with the fence to slide it into that groove... And then you can position it anywhere you want.
A pair of T-nuts and knobs on the backside allow you to secure it in place.
When you don't need the extension stop, just flip it around the other direction.
And now the block tucks behind and stays out of your way.
On the opposite end of the fence, I left an open spot here, and what that's for is a little backer strip that's adjustable.
A screw holds it in place in a little recessed slot, and you can slide this back and forth, flip it around, even replace it when it gets chewed up.
The idea here -- you can see by this starter curve that I cut -- is to provide backup on both sides of the table-saw blade.
That's gonna reduce and eliminate tear-out on the back edge of a piece.
Which brings us to the point of installing the fence on the sled itself.
On the bottom side, I locked in a T-nut into this counterbored hole that we drilled way early on in the process.
For these other two, we're gonna fit in a pair of what are called weld nuts.
And they kind of look like T-nuts but without the prongs on them, because we want them to be able to slide and adjust in there.
And those will be attached... ...with some long round knobs.
So what I can do now is... ...fit a weld nut in place.
Drop that in there.
♪♪ ♪♪ ♪♪ ♪♪ ♪♪ Alright.
There we have it.
We have a crosscut sled that can also tackle angles and mitered cuts.
It's a great upgrade to your table saw and a relatively easy project that you can build, probably knock it out in a good, solid weekend of some fun shop time.
Even though the two jigs that we built in today's episode -- the crosscut sled that I made and the tenoning that Chris showed you how to build -- look pretty different, but there's one thing they have in common.
They both have ways to adjust for accuracy and to suit a wide variety of project pieces.
And the process is pretty simple.
We showed a lot of skills on the drill press and what you can do with a handheld router and a router table to be able to add adjustability and some cool details to each of these projects.
And those skills, you'll be able to apply to other projects that you build, as well.
If you're ready to upgrade your table saw, the plans for both of these jigs are at our website -- WoodsmithShop.com.
You'll also find some great project ideas, more videos and articles on how to become a better woodworker.
And then we can come right back here and build another cool project in the Woodsmith Shop.
♪♪ If you'd like to get more video tips and techniques, sign up for the free weekly Woodsmith eTip.
Every week, you'll receive an e-mail with a video tip to get more out of your table saw, router table, and more.
Sign up at WoodsmithShop.com.
Everything in today's show comes from the newly expanded Woodsmith: Guild Edition, with shop projects, plans, tips, and techniques.
To get a free preview issue of the Woodsmith: Guild Edition and a free "Woodsmith" book, go to WoodsmithShop.com.
In addition, past seasons of "The Woodsmith Shop" are available on DVD... or you can watch them online from your computer, tablet, or mobile device.
For more information, go to WoodsmithShop.com.
Announcer: Major funding for "The Woodsmith Shop" has been provided by... Old Masters -- offering wood stains and finishes for the woodworking enthusiast and professional.
And by... Kreg.
From the first cut to the final assembly.
Providing woodworkers with products that help to simplify woodworking challenges.
Kreg.
Additional funding provided by... ♪♪ Titebond wood glues.
The pro's advantage.
♪♪ And by...
Here at Grizzly, woodworking isn't just our business.
It's our passion.
We love what we do.
Thank you for the opportunity to support "Woodsmith Shop" TV.


Support for PBS provided by:
Woodsmith Shop is a local public television program presented by Iowa PBS